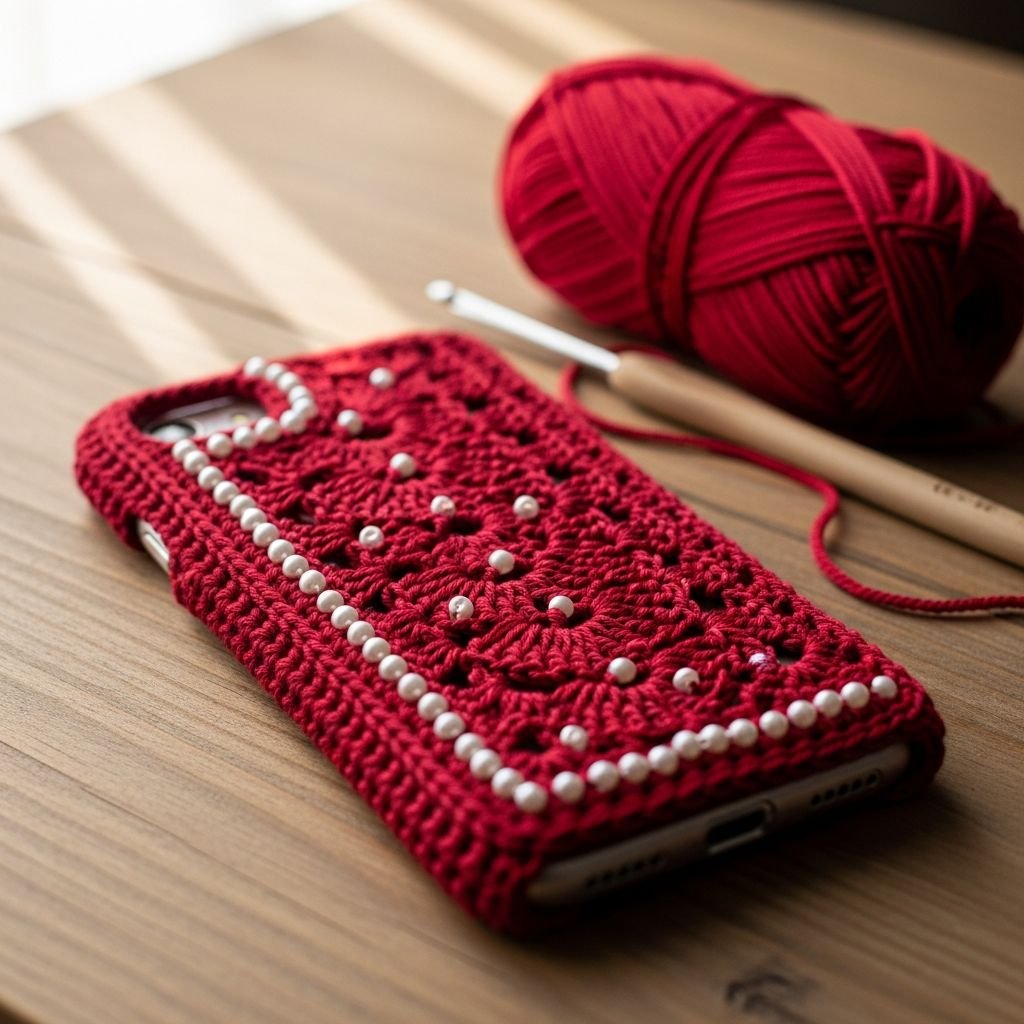
Elegant Crimson Rose & Pearl Crochet Phone Case Tutorial-Elevate your tech accessories with this stunning crimson red crochet phone case. This project combines the structural beauty of double crochet rows with the delicate elegance of layered floral appliqués and shimmering pearl accents. Whether you are looking to protect your device or simply want to showcase your crafting skills, this case offers a sophisticated, handmade aesthetic that stands out from factory-made alternatives. Follow this guide to create a bespoke piece that perfectly fits your specific phone model while adding a touch of vintage-inspired charm.
Materials Needed
- 50g Worsted weight cotton or acrylic yarn in Deep Red
- 3.0mm or 3.5mm crochet hook (adjust for gauge)
- Small white pearl beads (6mm and 8mm sizes)
- Clear plastic phone case for your specific model
- Strong clear adhesive (such as E6000 or hot glue)
- Yarn needle and sewing thread
- Scissors
Abbreviations
- ch: chain
- sc: single crochet
- dc: double crochet
- sl st: slip stitch
- mr: magic ring
- st: stitch
Step 1: Foundation and Lower Body

- Measure the width of your clear phone case and create a foundation chain that matches this width without stretching.
- Row 1: Dc in the 3rd chain from the hook and in each chain across, then turn your work.
- Continue working rows of dc until you reach the bottom edge of the camera lens cutout on your specific phone model.
- Ensure your tension is consistent to maintain a rectangular shape that aligns perfectly with the edges of the plastic case.
Step 2: Creating the Camera Cutout

- To create the window for the camera, work dc stitches only until you reach the side where the camera lens begins.
- Chain a length that spans the width of the camera lens, then skip the corresponding number of stitches on the previous row.
- Join the chain to the remaining stitches with a dc and finish the row to establish the bottom frame of the cutout.
- Work back and forth on the side panels of the camera window for the height of the lens before chaining across the top to close the window.
Step 3: Completing the Upper Panel

- Once the camera cutout is framed, resume working full rows of dc across the entire width of the piece.
- Continue until the crochet panel reaches the top edge of your phone case.
- Fasten off the yarn and weave in all loose ends using a yarn needle for a clean, professional finish.
- Block the piece lightly if necessary to ensure the edges are straight and the camera hole is properly squared.
Step 4: Crafting the Layered Flowers

- Create a magic ring and work 10 sc into the ring, joining with a sl st to form the center.
- For the petals, work (ch 3, 2 dc, ch 3, sl st) all into the same stitch, then skip one stitch and repeat to create a 5-petal flower.
- Repeat this process to create two flowers; you may vary the size by using hdc for a smaller flower or tc for a larger one.
- Sew a large pearl bead into the center of each flower using a needle and matching red thread.
Step 5: Beading and Embellishment

- Layout your crochet panel and place the two flowers at opposite corners (top right near the camera and bottom left) to plan the layout.
- Using a sewing needle and thread, string a series of pearl beads together to create a decorative ‘S’ curve connecting the two flowers.
- Securely stitch each pearl to the crochet fabric to ensure they do not shift or snag during daily use.
- Attach the flowers firmly over the ends of the pearl string to hide the thread knots and create a seamless transition.
Step 6: Final Assembly and Mounting

- Apply a thin, even layer of clear adhesive to the back of your plastic phone case, avoiding the camera lens area and the side buttons.
- Carefully press the crochet panel onto the adhesive, aligning the camera cutout and the edges of the yarn with the plastic frame.
- Press firmly for several minutes and allow the glue to cure completely (ideally 24 hours) before inserting your phone.
- Check all edges to ensure the yarn is flush with the case and trim any stray fibers for a polished look.
Frequently Asked Questions
Q: How do I ensure the case doesn’t interfere with the camera or flash?
A: It is vital to measure the exact dimensions of your camera bump before starting step 2. Always make the crochet opening slightly larger (about 1-2mm) than the actual lens area to prevent yarn fibers from appearing in your photos or blocking the flash.
Q: Will the crochet panel stretch out over time?
A: Because the panel is glued to a rigid plastic case, it will maintain its shape much better than a standalone crochet sleeve. Using a high-quality cotton yarn also helps minimize stretching compared to wool or loose acrylic.
Q: What is the best way to clean this case if it gets dirty?
A: Since it is glued to plastic and features pearl embellishments, do not machine wash. Spot clean the yarn gently with a damp cloth and mild soap. Avoid soaking the case, as this could weaken the adhesive bond.
Conclusion
Congratulations on completing your designer-inspired phone case! This project is a wonderful way to practice shaping and embellishment techniques while creating something functional. The combination of the rich red texture and the classic pearls makes this more than just a case—it is a piece of art. Wear it proudly or gift it to a friend who appreciates the beauty of handmade crafts. Happy crocheting!