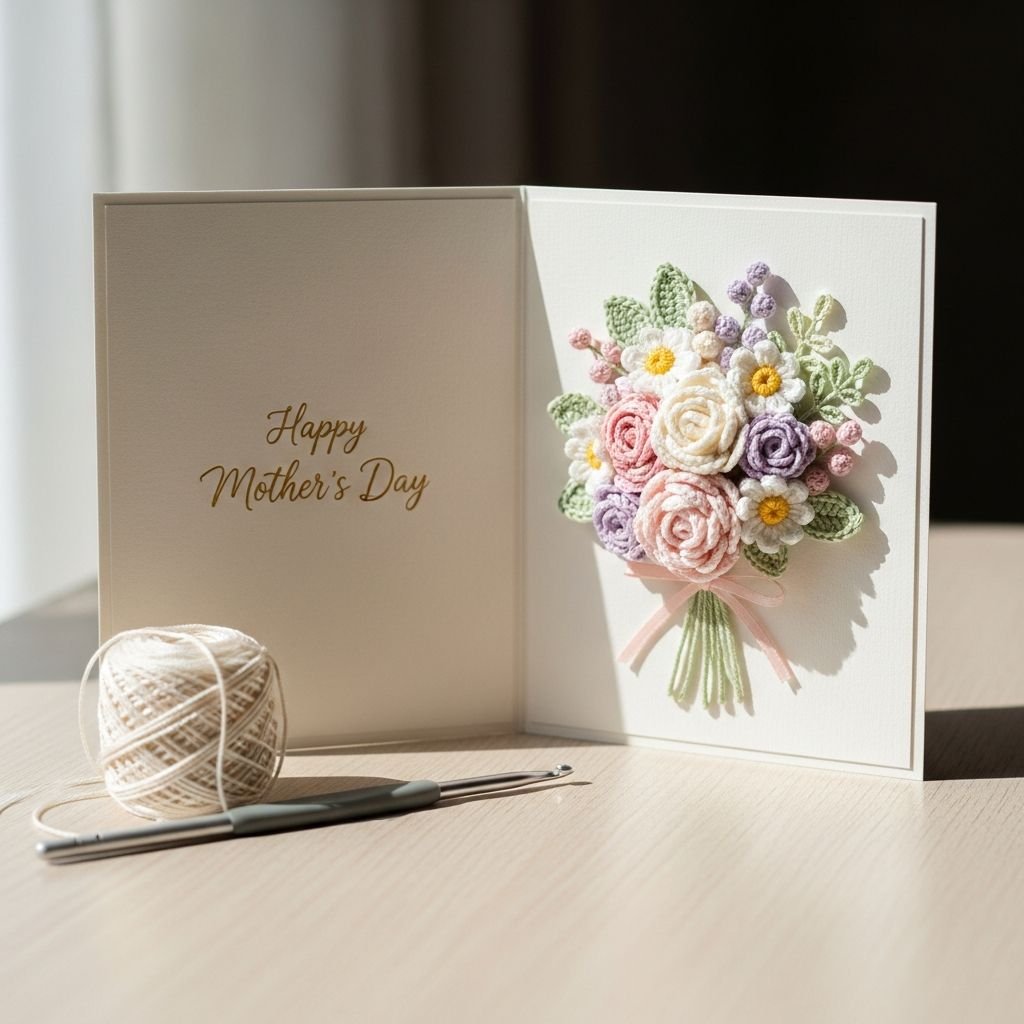
Elegant Hand-Crocheted Floral Bouquet Mother’s Day Card-Celebrate the special women in your life with a gift that combines the art of crochet with the sentimental touch of a handmade greeting. This 3D floral bouquet card features delicate layered petals and textured centers, creating a keepsakes that will be cherished far longer than a store-bought alternative. As a Master Crochet Instructor, I have designed this project to be both approachable for beginners and satisfying for seasoned crafters, utilizing basic stitches to achieve a professional, boutique-quality finish.
Materials Needed
- DK weight cotton or acrylic yarn in Dark Pink, Light Pink, and Olive Green
- 3.5mm (E) crochet hook
- Heavyweight white cardstock (pre-folded or 5×7 inches)
- Hot glue gun or high-tack craft glue
- Scissors and a yarn needle
- Fine-tip black permanent marker
Abbreviations
- ch: chain
- sl st: slip stitch
- sc: single crochet
- hdc: half double crochet
- dc: double crochet
- mr: magic ring
- st: stitch
Step 1: Create the Dark Pink Flower Centers

- Begin by creating a magic ring with the Dark Pink yarn to ensure a tight, gap-free center.
- Chain 1, then work 10 half double crochets (hdc) into the magic ring.
- Pull the yarn tail firmly to close the ring and join with a slip stitch to the first hdc.
- Fasten off the yarn, leaving a short tail for securing, and weave in the ends on the back side.
- Repeat this process to create a total of five centers for your bouquet.
Step 2: Crochet the Light Pink Petals

- Join the Light Pink yarn into any stitch of the dark pink center using a slip stitch.
- In the same stitch, work (ch 2, 2 dc, ch 2, sl st) to form your first petal.
- Slip stitch into the next stitch of the center to move your position.
- Repeat the petal sequence (ch 2, 2 dc, ch 2, sl st) in the next stitch, then sl st in the following stitch.
- Continue until you have 5 distinct petals around the center, then fasten off and weave in all remaining ends.
Step 3: Prepare the Green Yarn Stems

- Cut six to eight lengths of Olive Green yarn, each approximately 4 inches long.
- Gather the strands together and trim the bottom ends at slight varying angles to mimic a natural bunch of flower stems.
- Apply a thin vertical line of glue to the bottom half of the cardstock where the bouquet base will sit.
- Carefully press the green yarn strands into the glue, fanning them out slightly at the top and gathering them at the bottom.
- Ensure the top of the stems reach the area where the flower heads will be placed to provide a seamless look.
Step 4: Arrange and Adhere the Bouquet

- Lay your five finished flowers over the top of the green stems to find a pleasing, slightly overlapping arrangement.
- Once satisfied with the layout, apply a small dot of hot glue to the back of the center of each flower.
- Press each flower firmly onto the cardstock, starting from the bottom-most flowers and working your way up.
- Hold each flower in place for a few seconds to ensure the glue sets properly against the cardstock.
- Check that no yarn tails are peeking out from behind the petals and tuck them under if necessary.
Step 5: Tie the Decorative Bow

- Cut a 6-inch length of the Light Pink yarn to create the decorative ribbon for the bouquet.
- Tie the yarn into a simple bow with two loops, ensuring the loops are symmetrical and the tails are even.
- Apply a tiny drop of glue to the center of the green stems, about one inch from the bottom.
- Press the bow onto the glue and hold it firmly until it is secure.
- Trim the tails of the bow at a sharp angle to prevent fraying and provide a polished finish.
Step 6: Lettering and Finishing Touches

- Using a pencil, lightly trace the words ‘Happy Mother’s Day’ at the top of the card in a cursive font.
- Once you are happy with the spacing, go over the pencil marks with a fine-tip black permanent marker.
- Gently erase any visible pencil lines once the ink is completely dry to avoid smudging.
- Check the back of the card to ensure no glue has seeped through, and place it inside a matching envelope.
- Your professional-quality crochet card is now ready to be gifted!
Frequently Asked Questions
Q: What type of glue is best for attaching yarn to cardstock?
A: A hot glue gun is the most efficient choice as it bonds instantly. However, if you prefer more ‘wiggle room’ for placement, a high-tack white craft glue works well, though it requires longer drying time.
Q: Can I use a different yarn weight for this project?
A: Yes! You can use lace weight for tiny, delicate flowers or bulky yarn for a large, statement card. Just remember to adjust your hook size accordingly so the stitches remain tight and hold their shape.
Q: How do I prevent the card from bending under the weight of the yarn?
A: Using a high-gsm cardstock (at least 250-300gsm) is key. If your card feels flimsy, you can glue a second piece of cardstock inside the front cover to reinforce the panel where the flowers are attached.
Conclusion
You have successfully created a beautiful, tactile piece of art that serves as both a card and a keepsake. The textures of the crochet combined with the simplicity of the cardstock create a timeless aesthetic that any mother would be proud to display. Feel free to experiment with different flower colors—like lavender or yellow—to personalize the bouquet even further. Happy crocheting!