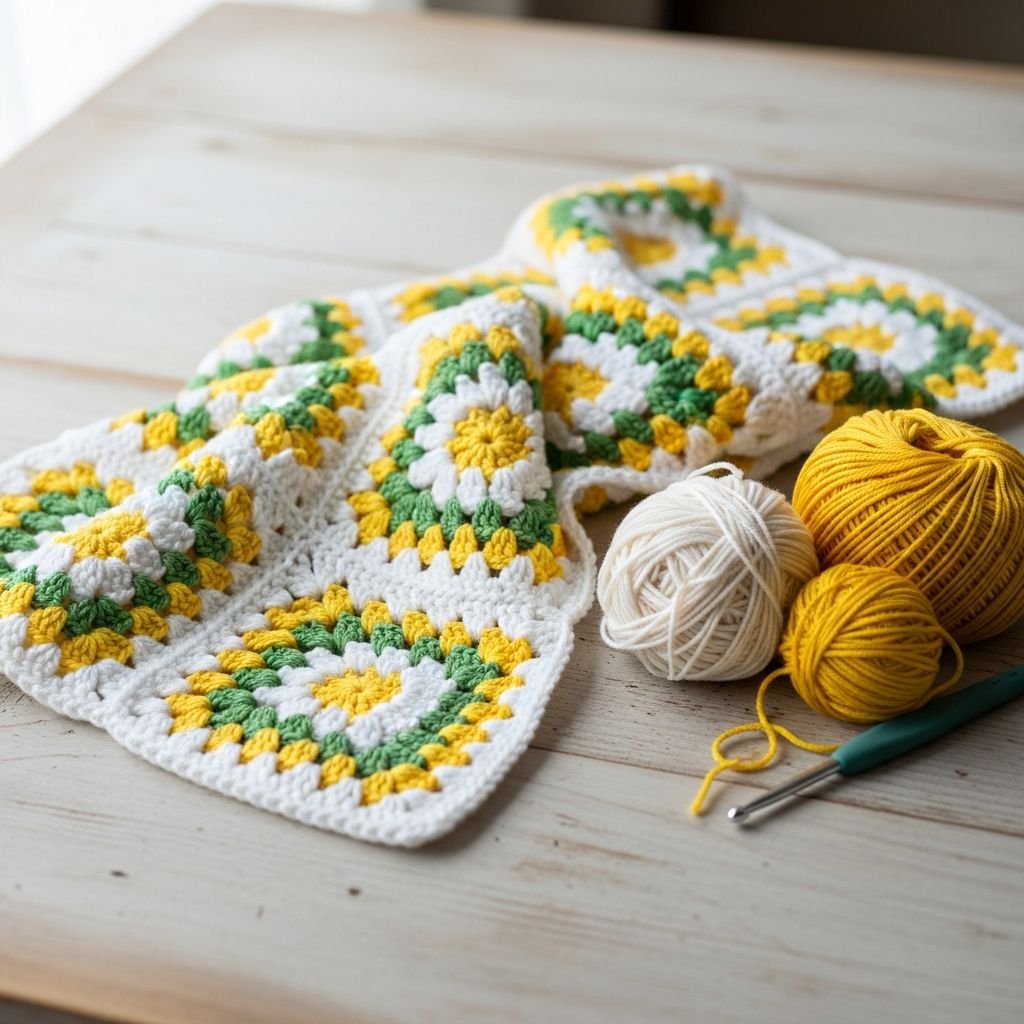
Radiant Daisy Garden Granny Square Baby Blanket-Welcome a new arrival with the timeless charm of our Radiant Daisy Garden Baby Blanket. This heirloom-quality piece combines the classic appeal of granny squares with whimsical, 3D-textured daisy motifs in soft pink, crisp white, and sunny yellow. Perfect for nurseries or as a thoughtful baby shower gift, this project is as enjoyable to make as it is to give.
Materials Needed
- Lightweight (DK) yarn in soft pink, white, and golden yellow
- 4.0mm (G/6) crochet hook
- Tapestry needle for weaving in ends
- Small scissors
- Blocking mats and pins (optional)
Abbreviations
- ch: chain
- sc: single crochet
- dc: double crochet
- sl st: slip stitch
- st: stitch
- sp: space
- lp: loop
- yo: yarn over
- cl: cluster stitch
Step 1: The Sunlit Center

- Starting with the golden yellow yarn, create a magic ring or chain 4 and join with a slip stitch to form a circle.
- Chain 3 (counts as your first double crochet), then work 11 double crochets into the center of the ring for a total of 12 stitches.
- Pull the magic ring tail tight to close the center hole completely.
- Join with a slip stitch to the top of the starting chain 3 and fasten off the yellow yarn.
Step 2: Blooming White Petals

- Attach the white yarn to any double crochet stitch from the yellow center using a slip stitch.
- Work a cluster stitch petal: ch 3, then work 2 partially finished double crochets into the same stitch, pulling through all loops to close the cluster.
- Chain 2 to create a space between petals, then work a 3-dc cluster into the next stitch of the yellow circle.
- Repeat around until you have 12 petals separated by chain-2 spaces, then join to the first cluster and fasten off.
Step 3: Squaring the Flower

- Join the soft pink yarn into any chain-2 space between the white petals.
- To form the first corner: ch 3 (counts as dc), work 2 dc, ch 2, and 3 dc all into the same space.
- In the next space, work 3 dc to form the side, then in the following space work another corner of [3 dc, ch 2, 3 dc].
- Continue this pattern around the circle (Corner, Side, Corner, Side) until you have a square shape with 4 distinct corners.
- Join with a slip stitch to the starting chain and work one additional round of dc in pink if a larger square is desired.
Step 4: Joining the Garden

- Lay out your finished squares (typically 6 squares wide by 8 squares long) to ensure color consistency and placement.
- Place two squares right sides together and join using a slip stitch through the back loops only for a flat, professional seam.
- Alternatively, use a tapestry needle and pink yarn to whip stitch the squares together for a more invisible join.
- Work in long rows first (horizontal), then join the rows together (vertical) to keep the blanket structure stable.
Step 5: The Elegant Scalloped Border

- Attach white yarn to any corner of the assembled blanket and work one round of single crochet evenly around the entire perimeter.
- For the second border round, switch to pink and work shell stitches: skip 2 stitches, work 5 dc into the next stitch, skip 2 stitches, and sc into the next.
- Ensure the shells are evenly spaced so the border does not ruffle or pull the blanket tight.
- Finish with a final round of slip stitches in white along the very edge of the pink shells to make the scallops pop.
Step 6: Finishing and Blocking

- Use a tapestry needle to weave in every loose yarn tail securely on the wrong side of the blanket.
- Gently hand wash the blanket in cool water with a mild baby-safe detergent and lay flat on a towel.
- Pin the blanket to a blocking mat, ensuring the corners are square and the edges are straight to set the final shape.
- Allow to air dry completely before presenting the blanket to the lucky recipient.
Frequently Asked Questions
Q: How many total squares do I need for a standard baby blanket?
A: For a standard stroller-sized blanket (approx. 30×35 inches), you will typically need about 48 squares arranged in a 6×8 grid, depending on your individual tension.
Q: Can I use a different yarn weight for this project?
A: Yes, but it will change the size of the squares. If you use Worsted weight yarn, your blanket will be larger and heavier; just be sure to increase your hook size to a 5.0mm or 5.5mm.
Q: How do I make sure my daisies don’t look floppy?
A: The key is the tension of the cluster stitches. Make sure you pull your loops up to a consistent height and close the cluster tightly with the chain-2 space to give the petals their ‘pop’ and structure.
Conclusion
Congratulations on completing your Radiant Daisy Garden Baby Blanket! You’ve created more than just a nursery accessory; you’ve crafted a handmade heirloom that will provide warmth and comfort for years to come. Don’t forget to take a photo of your masterpiece and share it with your fellow crafters. Happy stitching!