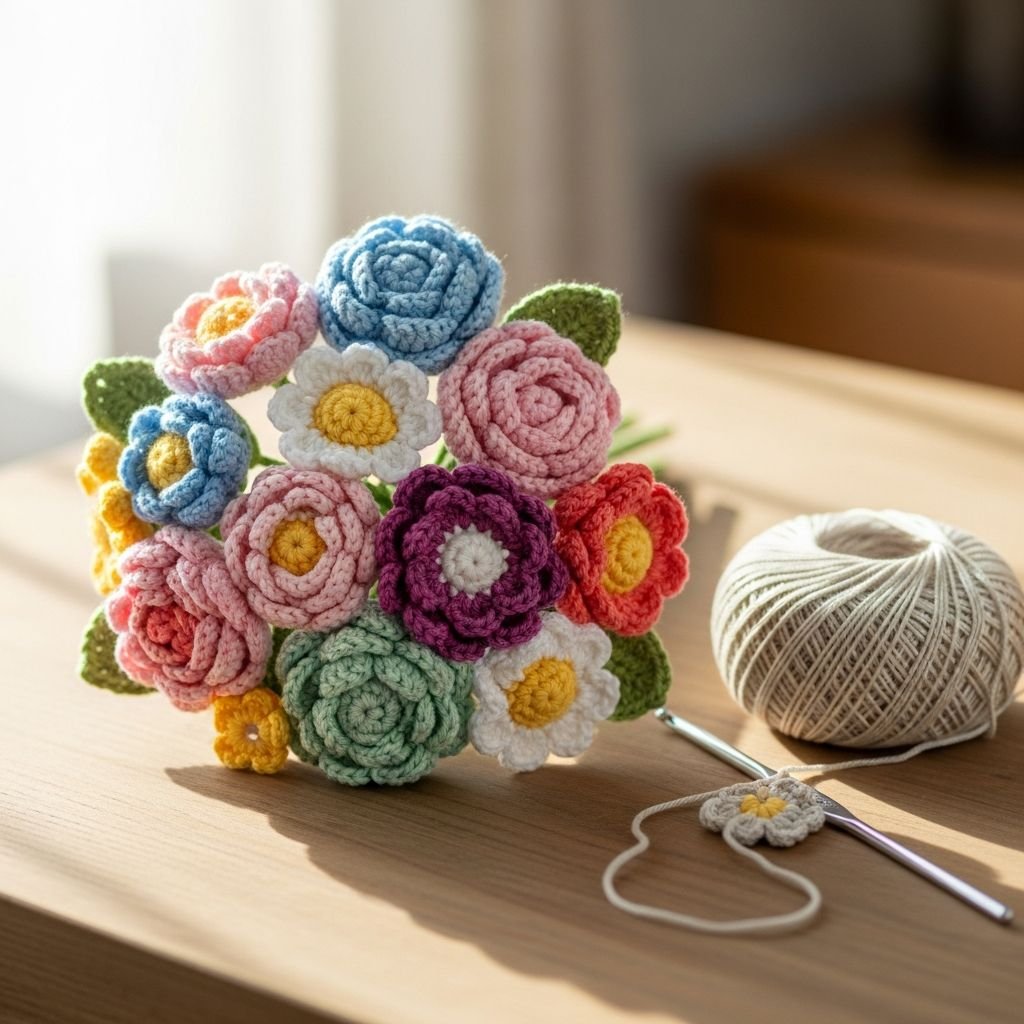
Mastering the Everlasting Garden: A Professional Guide to Mixed Floral Bouquets-Welcome to the art of botanical crochet. In this masterclass, we will transform simple yarn into a sophisticated, multi-textured bouquet inspired by classic garden favorites like roses, daisies, and tulips. By combining various shaping techniques and structural supports, you will create a stunning centerpiece that maintains its bloom forever. Whether you are crafting a gift or home decor, this guide provides the technical precision needed for a florist-quality result.
Materials Needed
- DK Weight Cotton Yarn in Pink, Lilac, Cream, Yellow, and Forest Green
- 2.5mm and 3.0mm Crochet Hooks
- 20-gauge and 24-gauge Floral Wire
- Premium Polyester Fiberfill
- Green Floral Tape
- Tapestry Needle and Sharp Embroidery Scissors
- Hot Glue Gun for secure assembly
Abbreviations
- MR: Magic Ring
- ch: chain
- sc: single crochet
- hdc: half double crochet
- dc: double crochet
- tr: treble crochet
- sl st: slip stitch
- inc: increase
- dec: decrease
Step 1: Constructing the Romantic Roses

- Begin by chaining a foundation of 60 stitches to allow for a full, lush petal count.
- Work a row of V-stitches (dc, ch 2, dc) into every third chain to create the base for the petals.
- In the final row, work 7-9 dc into each chain-2 space, creating a scalloped edge that mimics natural petal curves.
- Starting from the narrow end, roll the strip tightly to form the center bud, then more loosely as you move outward.
- Use a tapestry needle to sew through the base layers firmly, ensuring the rose holds its spiral shape.
Step 2: Crafting the Delicate White Daisies

- Using yellow yarn, start with a Magic Ring and work 6 sc, followed by a round of increases to create a flat 12-sc disk.
- Switch to white yarn and begin the petals by chaining 10 for each individual petal unit.
- Work back down the chain with sl st, sc, and hdc to create a tapered, realistic petal point.
- Slip stitch into the next yellow base stitch and repeat the process until you have 12 uniform petals.
- Steam block the finished daisies lightly to ensure the petals lay flat and radiate evenly from the center.
Step 3: Shaping the Structural Tulips

- Create a Magic Ring and work in continuous rounds, increasing until you reach a diameter of 18 or 24 stitches.
- Work 10-12 rounds of even sc to build the height of the tulip ‘cup’, maintaining a consistent tension.
- Lightly stuff the bulb with fiberfill, ensuring it is plump but not stretching the stitches.
- Pinch the top opening shut and sew across the middle, then rotate 90 degrees and sew again to create the four-pointed closure.
- Fasten off and hide the tail inside the tulip body for a seamless, professional look.
Step 4: Creating Poseable Foliage

- Chain 15-20 stitches using forest green yarn to serve as the central vein of the leaf.
- Work a sequence of sc, hdc, dc, and tr around the chain, then work down the opposite side to create an oval leaf.
- Place a length of 24-gauge wire along the final round and sc over it to integrate the wire into the edge.
- Finish the tip with a ‘picot’ stitch (ch 2, sl st in first ch) to give the leaf a sharp, organic point.
- Twist the wire ends at the base to create a small ‘stem’ that can be easily attached to the main flower.
Step 5: Wiring and Stem Wrapping

- Cut the 20-gauge floral wire to your desired length and create a small hook at one end with pliers.
- Apply hot glue to the hook and insert it into the base of the flower head, pressing firmly until set.
- Attach green yarn at the base of the flower and wrap it tightly down the length of the wire.
- Incorporate leaves as you wrap by placing their wire stems against the main wire and wrapping over them.
- Secure the end of the yarn at the bottom of the wire with a tiny dab of glue for a clean finish.
Step 6: Final Arrangement and Styling

- Begin the arrangement by placing the largest roses in the center to serve as the focal point.
- Intersperse the tulips and daisies at varying heights to create a natural, ‘just-picked’ appearance.
- Bend the wired leaves outward to fill any gaps and hide the inner wire stems from view.
- Secure the entire bundle with floral tape before placing it into a wicker basket or ceramic vase.
- Give the petals a final adjustment, fluffing the roses and tilting the daisies to catch the light.
Frequently Asked Questions
Q: What is the best yarn for these flowers?
A: A high-quality mercerized cotton is best. It provides excellent stitch definition, a slight sheen that looks more natural, and enough structural integrity to prevent the flowers from wilting over time.
Q: How do I make my flowers look more realistic?
A: The key is varying your tension and using wire. Using thinner wire in the leaves allows you to curve them naturally, while subtle color changes or ‘shading’ with fabric markers can add depth to petals.
Q: How do I clean my crochet bouquet?
A: Avoid submerging the bouquet in water as it may rust the internal wires. Use a hairdryer on a cool, low setting to blow off dust, or gently spot clean with a damp cloth if necessary.
Conclusion
Congratulations on completing your handcrafted floral masterpiece! By mastering these diverse techniques, you’ve created more than just a decoration; you’ve crafted a piece of art. Continue experimenting with different yarn weights and colors to expand your garden. Happy crocheting!