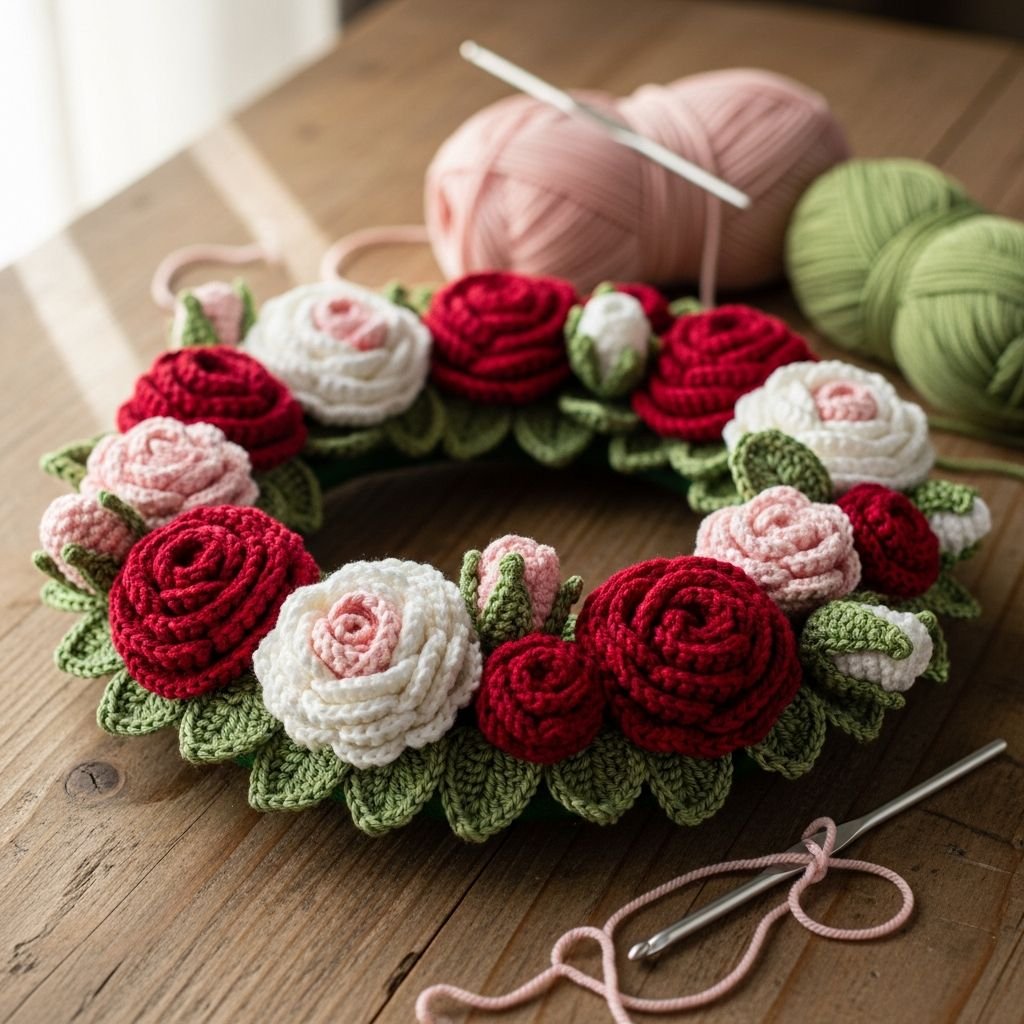
Romantic Bloom: Hand-Crafted Crochet Rose Wreath Tutorial-Transform your home decor with the timeless elegance of a crochet rose wreath. This project combines the structural beauty of individual floral elements with a lush, botanical arrangement that stays fresh year-round. Whether you are looking for a stunning front door statement or a romantic indoor accent, this tutorial will guide you through crafting life-like roses and assembling them into a professional-grade masterpiece.
Materials Needed
- Medium weight (4) cotton or acrylic yarn in Red, Dark Red, Blush Pink, and Cream
- Medium weight (4) yarn in Forest Green for leaves
- 4.0mm (G) crochet hook
- Tapestry needle and scissors
- 10-inch foam or wire wreath form
- Hot glue gun or floral wire for assembly
Abbreviations
- ch: chain
- sc: single crochet
- hdc: half double crochet
- dc: double crochet
- tr: treble crochet
- sl st: slip stitch
- st: stitch
Step 1: The Rose Foundation Chain

- Begin by creating a slip knot and chaining 51 for a medium-sized rose.
- In the 4th chain from the hook, work one dc, then ch 2 and work another dc into the same stitch to create a V-shape.
- Skip two chains and repeat the V-stitch (dc, ch 2, dc) in the next chain all the way to the end.
- You should have a long, flexible strip of mesh-like windows that will serve as the base for your petals.
Step 2: Crocheting the Petals

- Turn your work and ch 3 (counts as first dc); work 5 dc into the first ch-2 space, then sl st into the space between the V-stitches.
- In the next three ch-2 spaces, work 6 dc to create the small inner petals.
- For the remaining spaces, work 8 to 10 dc into each loop to create larger, outer petals that will give the rose volume.
- Fasten off your yarn leaving a long tail (at least 12 inches) for sewing the flower together later.
Step 3: Rolling and Shaping the Rose

- Lay the finished strip flat and begin rolling it tightly from the end with the smallest petals toward the larger ones.
- As you roll, keep the bottom edge of the foundation chain perfectly aligned to ensure a flat base.
- Thread your long yarn tail onto a tapestry needle and sew through all layers of the foundation chain at the bottom.
- Secure the stitches firmly so the rose doesn’t unravel, then repeat the process for approximately 12-15 roses in varying colors.
Step 4: Crafting the Green Leaves

- Ch 10 using green yarn, then work 1 sc in the second ch from the hook.
- Work across the chain: 1 hdc, 1 dc, 2 tr, 1 dc, 1 hdc, and 1 sc; then ch 2 and work down the opposite side of the foundation chain.
- Mirror the stitches on the second side to create a symmetrical leaf shape, finishing with a sl st to the first sc.
- Create 15-20 leaves to provide enough greenery to tuck behind the roses in the final arrangement.
Step 5: Preparing the Wreath Base

- If using a wire frame, you may wish to crochet a simple sc cover or wrap it in green ribbon to provide a better surface for glue.
- Arrange your finished roses on the frame without glue first to determine the color distribution and spacing.
- Aim for a balanced mix of red, pink, and cream tones to recreate the ombré-like effect seen in the inspiration image.
- Take a photo of your layout so you have a reference guide once you start the permanent attachment.
Step 6: Final Assembly and Finishing

- Apply a generous amount of hot glue to the flat base of each rose and press firmly onto the wreath form.
- Apply glue to the stems of the leaves and tuck them in pairs behind the roses so they peek out around the edges.
- Ensure all elements are secured tightly and that there are no visible gaps showing the wreath frame beneath.
- Add a small yarn loop or ribbon to the back of the wreath for easy hanging on your door or wall.
Frequently Asked Questions
Q: How do I make the roses different sizes?
A: To make smaller buds, simply start with a shorter foundation chain (e.g., ch 21 or 31). For larger blooms, increase the chain count and add more treble crochets to the outer petals.
Q: Can I use this wreath outdoors?
A: Yes, but it is best kept in a sheltered area like a covered porch. Use 100% acrylic yarn as it holds up better to moisture and sunlight than cotton, which can fade or mildew.
Q: What is the best way to clean the crochet wreath?
A: Since it is a decorative piece with glue, avoid submerging it in water. Use a hair dryer on a cool setting or a lint roller to gently remove dust.
Conclusion
Congratulations on finishing your Romantic Bloom Rose Wreath! By combining these simple floral techniques, you’ve created a piece of art that brings warmth and texture to any space. Don’t be afraid to experiment with different color palettes—like sunflowers for autumn or white lilies for spring—to keep your home looking beautiful all year round. Happy hooking!