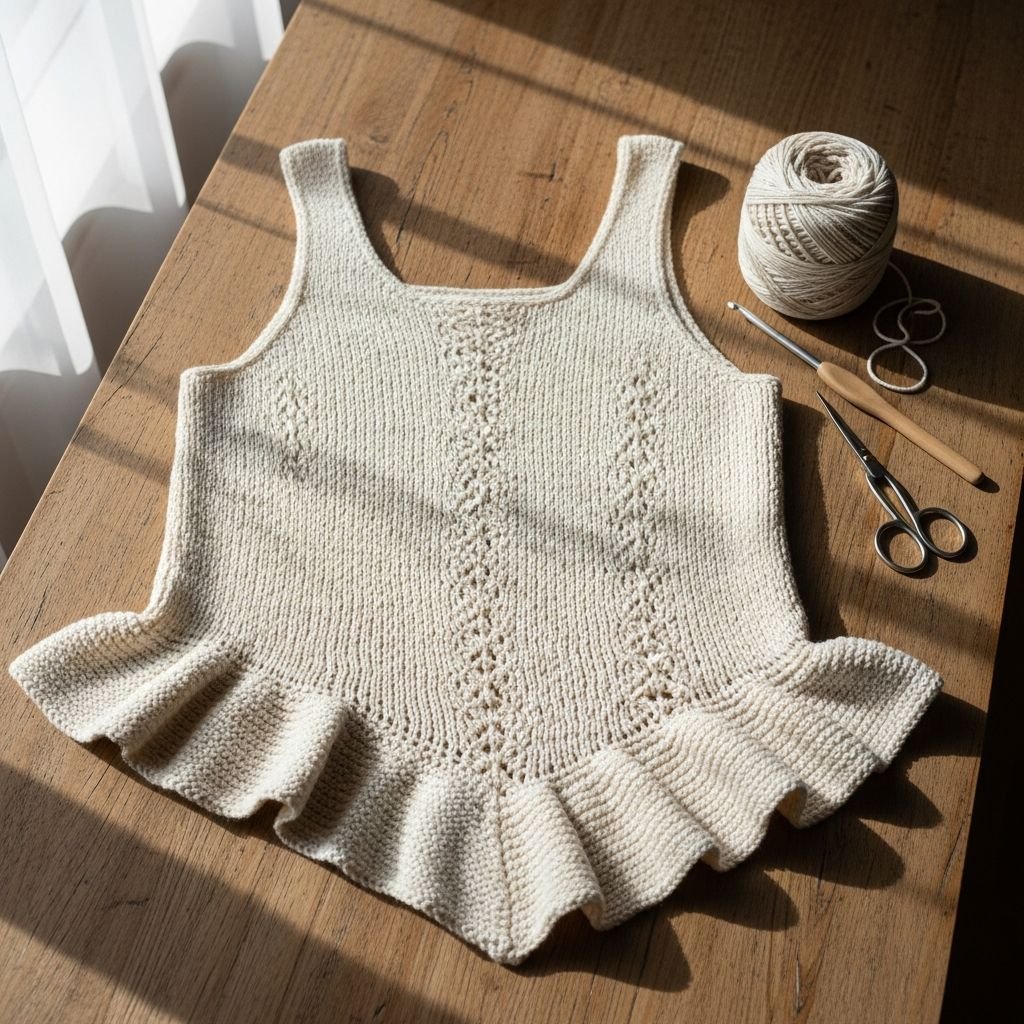
DIY Soleia Romantic Ruffle Asymmetrical Knit-Look Crochet Top-Embrace your romantic side with this stunning Soleia-inspired crochet top. Featuring a vintage-inspired button front, delicate ruffle detailing, and a flattering asymmetrical hem, this piece combines modern style with classic crochet techniques. This tutorial will guide you through creating a ‘knit-look’ ribbed texture using basic crochet stitches, resulting in a garment that looks professionally manufactured but carries the soul of a handmade treasure.
Materials Needed
- 350g-450g of DK weight cotton or cotton-acrylic blend yarn in Pastel Pink
- 4.0mm (G) crochet hook
- 6-8 small pearl buttons (approx. 10mm)
- Yarn needle for weaving ends and sewing buttons
- Stitch markers
- Measuring tape
Abbreviations
- ch: chain
- sc: single crochet
- hdc: half double crochet
- dc: double crochet
- BLO: back loop only
- sl st: slip stitch
- st: stitch
- inc: increase
Step 1: Establishing the Knit-Look Ribbed Base

- Begin by creating a foundation chain that matches the desired length from your underarm to your waistline.
- Work rows of Half Double Crochet (hdc) exclusively in the Back Loop Only (BLO) to create the vertical ribbed ‘knit’ effect seen in the photo.
- Continue this ribbing until the panel is wide enough to cover from your side seam to the start of your bust area.
- Ensure your tension remains consistent to prevent the ribbing from becoming uneven or overly loose.
- Mark the final row of this section with a stitch marker to indicate where the bust shaping begins.
Step 2: Shaping the Sweetheart Bust Panels

- To create the curved bust area, begin increasing the number of stitches at the top of your rows while maintaining the BLO hdc ribbing on the bottom.
- Use short-row techniques to add height specifically to the center of the bust, creating the rounded cup shape.
- Work the increases gradually over several rows to ensure the curve is smooth and follows the natural contour of the body.
- Once the peak of the bust is reached, begin mirrored decreases to bring the panel back down to the original side-seam height.
- Create two identical front panels (left and right), making sure to reverse the shaping so they are symmetrical.
Step 3: Crafting the Ribbed Back Panel

- Chain the same number of stitches used for the side of the front panel to ensure the side seams will align perfectly.
- Work in continuous rows of hdc BLO ribbing without any increases or decreases.
- Continue working until the panel is wide enough to span the width of your back from side seam to side seam.
- Periodically check the stretch of the ribbing against your back measurements; the fabric should be snug but not overstretched.
- Fasten off and leave a long tail of approximately 20 inches for seaming the pieces together later.
Step 4: Creating the Voluminous Ruffled Straps

- Join your yarn at the top peak of the front bust panel and chain the length required to reach the back panel over the shoulder.
- Work a foundation row of single crochet (sc) along the chain and then turn your work.
- To create the ruffle, work 4 double crochet (dc) stitches into every single stitch across the entire length of the strap.
- For extra volume, work a second row of ruffles by placing 2 dc into every stitch from the previous ruffled row.
- Repeat this process for the second strap, ensuring both have the same stitch count for a balanced look.
Step 5: Assembly and Button Placket

- Place the front and back panels with right sides together and join the side seams using a mattress stitch for an invisible finish.
- Along the center front edges of the bust panels, work 3 rows of sc to create a flat, sturdy placket for the buttons.
- On the right-hand placket, create buttonholes by chaining 2 and skipping 2 stitches at even intervals (approximately every 2 inches).
- Sew the pearl buttons onto the left-hand placket, carefully aligning them with the buttonholes on the opposite side.
- Reinforce the top and bottom of the placket with extra stitches to prevent the garment from pulling or gapping.
Step 6: Adding the Asymmetrical Ruffled Hem

- Attach your yarn to the bottom edge of the garment at the side seam and work a row of sc around the entire circumference.
- To achieve the asymmetrical ‘pointed’ look, work hdc in the back and sides, transitioning to dc and treble crochet (tr) as you reach the center front.
- Work a final ruffle row by placing 3 dc into every stitch along the bottom edge, which creates the wavy, romantic border.
- Fasten off all yarn and use a yarn needle to weave in every loose end securely on the inside of the garment.
- Steam block the ruffles lightly to help them lay flat and accentuate the drape of the cotton yarn.
Frequently Asked Questions
Q: What is the best yarn for this project?
A: A cotton or cotton-bamboo blend is ideal. These fibers provide the ‘knit-look’ stitch definition required for the ribbing and have the weight necessary to make the ruffles drape beautifully without being too bulky.
Q: How do I make sure the top fits snugly?
A: Crochet ribbing (hdc BLO) is very stretchy. When measuring, you should aim for about 2 inches of ‘negative ease,’ meaning the garment should measure 2 inches smaller than your actual body circumference so that it stretches to fit perfectly.
Q: Can I adjust the length of the top?
A: Yes! Because the top is worked sideways, you can easily adjust the length by changing the number of stitches in your foundation chain. For a cropped look, use fewer chains; for a longer tunic style, add more.
Conclusion
Congratulations on completing your Soleia Ruffle Top! This project is a wonderful exercise in shaping and texture, resulting in a feminine piece that looks like it came straight from a high-end boutique. Wear your creation with high-waisted jeans or a flowing skirt, and enjoy the many compliments on your artisanal skill!