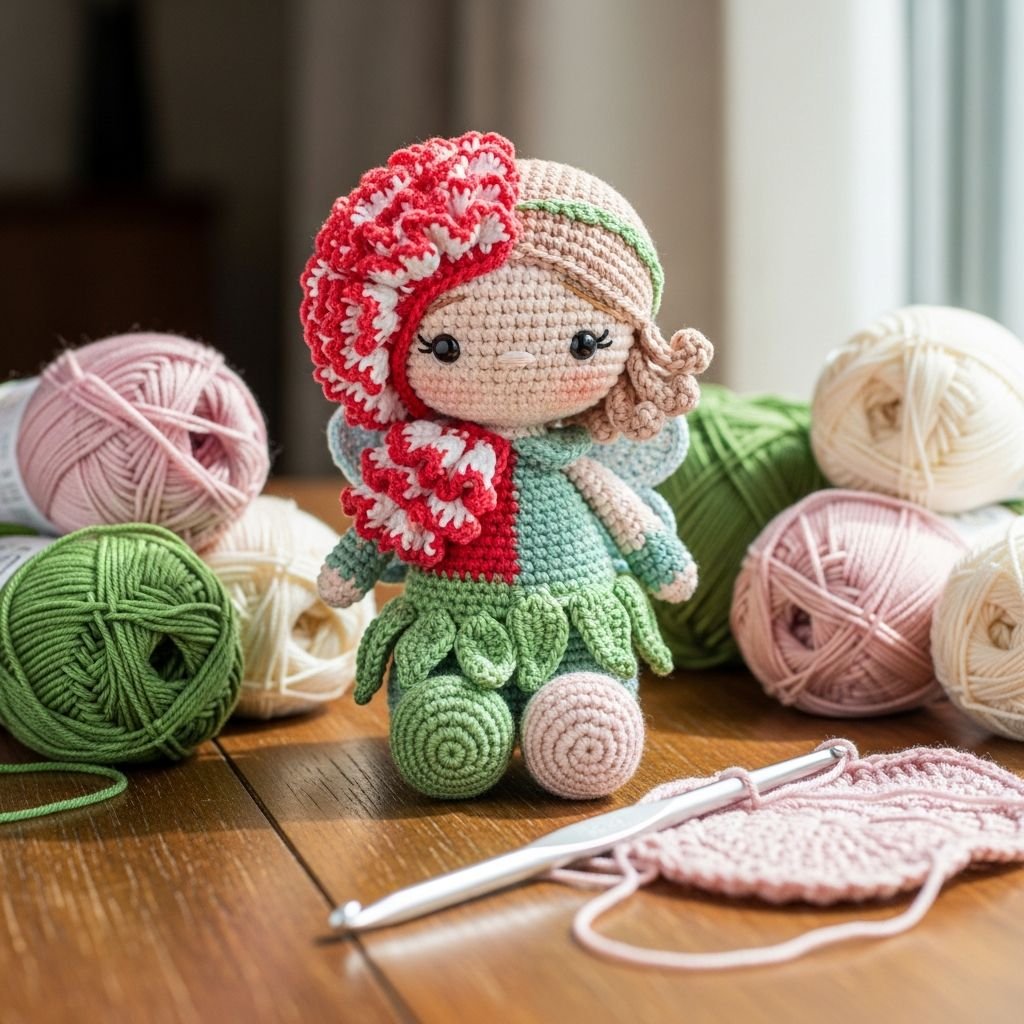
Masterclass: Crafting the Reversible Carnation Fairy Amigurumi Doll-Welcome to a world where botanical beauty meets whimsical craft. In this comprehensive tutorial, I will guide you through the intricate process of creating a ‘flip’ doll—a sophisticated amigurumi piece that transforms from a lush lavender carnation into a charming miniature fairy. This project utilizes specialized ‘increase-heavy’ techniques to achieve that iconic ruffled floral texture, paired with structural amigurumi principles to ensure a seamless reversible mechanism.
Materials Needed
- 2.5mm crochet hook
- Cotton DK weight yarn in Lavender, Peach, and Forest Green
- Polyester fiberfill stuffing
- Black embroidery floss for facial features
- Stitch markers and yarn needle
- Optional: 2mm floral wire for a poseable stem
Abbreviations
- MR: Magic Ring
- sc: single crochet
- inc: increase (2 sc in one stitch)
- dec: decrease (sc 2 together)
- dc: double crochet
- FLO: front loop only
- BLO: back loop only
- sl st: slip stitch
Step 1: The Fairy Head and Torso

- Begin with Peach yarn and a Magic Ring, working 6 sc into the center to establish the crown of the head.
- Work through standard amigurumi increase rounds (6, 12, 18, 24) until the head reaches the desired diameter.
- Switch to Lavender yarn at the neck junction to begin the bodice, using a color-change technique for a clean line.
- Stuff the head firmly with fiberfill before narrowing the torso with invisible decreases to create a petite waist shape.
Step 2: Constructing the Reversible Flower Cup

- At the waistline, work one round in BLO (Back Loop Only) to create a ‘hinge’ where the skirt will later attach.
- Using Green yarn, create a bowl-shaped ‘sepal’ that mirrors the size of the doll’s head to allow for total concealment when flipped.
- Ensure the tension is tight enough to maintain the structural integrity of the ‘cup’ so it holds its shape during the reversal.
- Leave a long tail for attaching the stem later in the assembly process.
Step 3: Creating the Carnation Ruffles

- Join Lavender yarn to the FLO (Front Loop Only) left at the waistline to begin the voluminous skirt.
- In the first round of the skirt, work 3 dc into every single stitch to immediately create a wavy, ruffled effect.
- For the second and third rounds, continue the aggressive increase pattern (e.g., 2 dc in every stitch) to build the ‘petal’ density.
- Finish the final round with a picot stitch or a simple sl st edge to mimic the delicate, serrated edges of a real carnation flower.
Step 4: Sculpting the Hair and Facial Features

- Create the ‘bun’ by crocheting a small sphere in Lavender and sewing it to the top of the head.
- Add ‘petal hair’ details by working chain loops around the bun to mimic the look of a flower bud on top of the fairy’s head.
- Use black embroidery floss to sew two simple ‘sleeping’ curved lines for the eyes and a small stitch for the mouth.
- Apply a tiny amount of pink fabric chalk or blush to the cheeks for a professional, ‘kawaii’ finish.
Step 5: The Miniature Arms and Assembly

- Crochet two small tubes in Peach yarn (starting with 4 sc in MR) to serve as the fairy’s arms.
- Lightly stuff the lower half of the arms but leave the tops flat for easier attachment to the sides of the bodice.
- Sew the arms just below the neck line using a whip stitch, ensuring they are symmetrical.
- Check all yarn tails and weave them into the body to ensure the reversible mechanism doesn’t snag.
Step 6: The Stem and Final Reversal Test

- Using Green yarn, crochet a long, thin cord or use a ‘sc around a wire’ technique to create the flower stem.
- Secure the stem firmly to the center-bottom of the green flower cup created in Step 2.
- Test the mechanism: push the doll’s head down into the ‘cup’ while pulling the ruffles up and over to transform it into a carnation.
- Adjust the ruffles with your fingers to ensure the doll is completely hidden when in flower mode.
Frequently Asked Questions
Q: Why is my flower skirt not as ruffly as the photo?
A: The ‘ruffle’ effect is created by extreme increases. Ensure you are working at least 3 double crochets into every single stitch. If it still looks flat, add an extra round of ‘2 dc in each stitch’ to increase the circumference.
Q: The doll’s head is peaking out when it’s a flower. How do I fix this?
A: This usually means the green ‘cup’ or the skirt ruffles aren’t tall enough. You can add one or two more rounds of double crochet to the skirt to ensure it provides full coverage when flipped upward.
Q: Is floral wire necessary for the stem?
A: It is optional, but highly recommended. The wire allows the carnation to stand upright in a vase or be posed, whereas a yarn-only stem will be floppy.
Conclusion
Congratulations on completing your Reversible Carnation Fairy! This project is a testament to the versatility of amigurumi. Whether sitting on a shelf as a beautiful flower or held in a hand as a tiny companion, your creation is sure to spark joy. Keep experimenting with different petal colors to create an entire bouquet of reversible garden fairies!