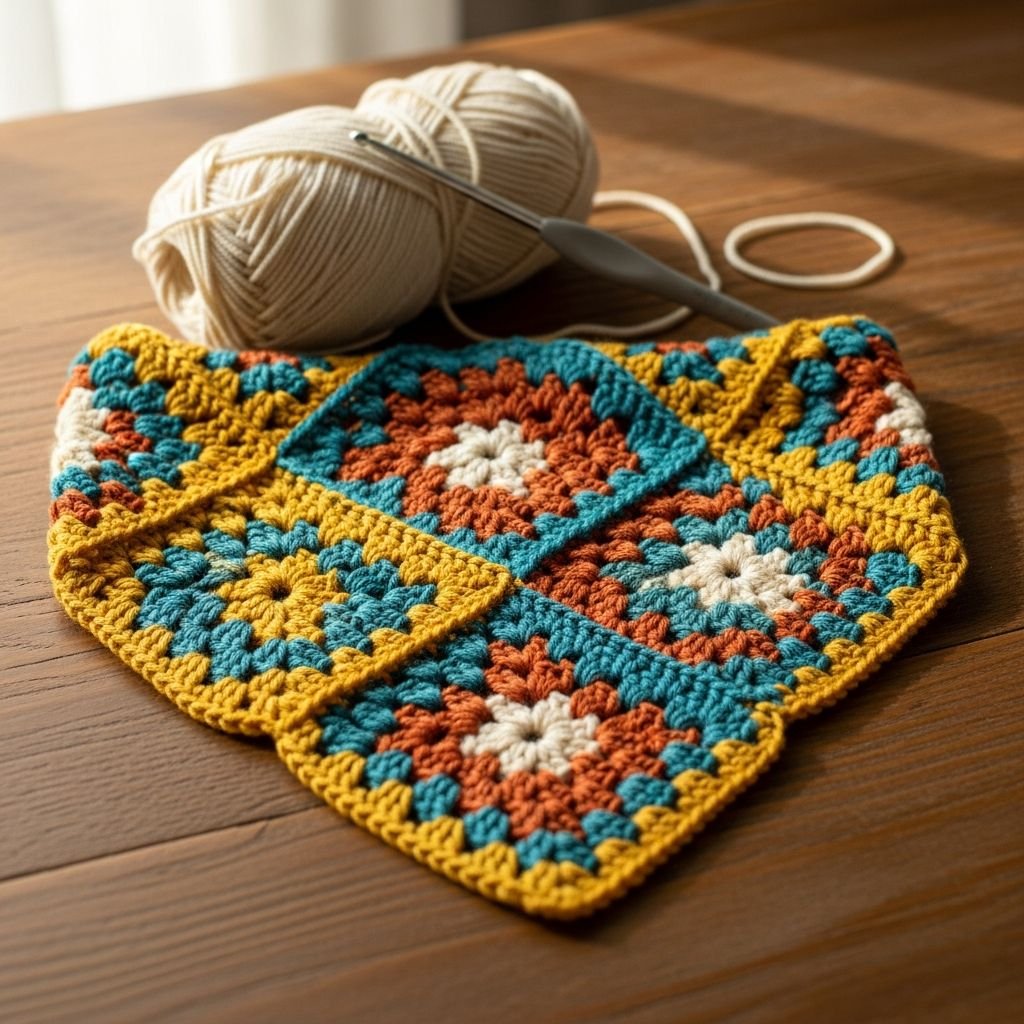
The Vintage Granny Stitch Bandana: A Masterclass Tutorial-Welcome to the ultimate guide for creating the timeless Granny Stitch Bandana. This versatile accessory, shown here in classic cream, deep burgundy, and earthy beige, is a staple of bohemian fashion. Combining the rhythmic flow of the traditional granny cluster with a delicate picot border, this project is perfect for crocheters looking to practice their shaping while creating a functional, stylish piece of wearable art. Let’s pick up our hooks and transform a simple ball of cotton into a beautiful headpiece.
Materials Needed
- 50-75g of DK weight cotton or cotton-blend yarn
- 4.0mm (G) crochet hook
- Tapestry needle for weaving in ends
- Sharp embroidery scissors
- Stitch markers (optional but helpful)
Abbreviations
- ch: chain
- sc: single crochet
- dc: double crochet
- sl st: slip stitch
- sp: space
- st: stitch
- picot: ch 3, sl st in first ch
Step 1: Foundation and the First Cluster

- Begin by creating a magic ring to ensure a tight, adjustable center at the top-midpoint of your bandana.
- Chain 4 (this counts as your first double crochet and a chain-1 space).
- Work 3 double crochets into the ring to form your first granny cluster.
- Chain 2 to create the center point, then work another 3 double crochets into the ring.
- Finish the row with a chain 1 and a final double crochet into the ring, then pull the magic ring tail to close.
Step 2: Establishing the Granny Growth

- Turn your work and chain 4 (counts as 1 dc and ch 1) to begin the second row.
- Work 3 double crochets into the first chain-1 space from the previous row.
- Chain 1, then work the corner cluster (3 dc, ch 2, 3 dc) into the center chain-2 space.
- Chain 1, work 3 double crochets into the last chain-1 space, then chain 1 and work a final dc into the 3rd chain of the turning chain.
- Ensure your stitches are even and the triangle shape is beginning to form clearly from the center out.
Step 3: Building the Body to Size

- Repeat the growth pattern established in Step 2 for approximately 12 to 15 rows, or until the bandana measures your desired width.
- In each row, always work 3 dc into every chain-1 space across the sides.
- Always maintain the center ‘point’ by working (3 dc, ch 2, 3 dc) into the central chain-2 space.
- Keep your tension consistent to prevent the edges of the triangle from curling excessively.
- Count your clusters on each side of the center point to ensure the triangle remains symmetrical.
Step 4: The Decorative Picot Edging

- Once the body is complete, do not fasten off; turn your work to begin the decorative border along the two slanted sides.
- Work a single crochet into the first stitch, then chain 3 and slip stitch into the first chain to create a picot.
- Skip one stitch and work a single crochet into the next, followed by another picot stitch.
- Continue this ‘sc, picot, skip 1’ sequence along the entire perimeter of the two angled sides of the triangle.
- This creates the delicate scalloped edge seen in the reference image, adding a professional finish to the piece.
Step 5: Crafting the Support Ties

- When you reach the top corner of the triangle, chain 50 to 60 (or about 10-12 inches) to create the first tie.
- Slip stitch back down the chain toward the bandana to add thickness and durability to the strap.
- Work single crochets across the straight top edge of the bandana to reach the opposite corner.
- Repeat the chain and slip stitch process for the second tie on the other side.
- Secure the final stitch with a slip stitch into the body of the bandana to ensure the tie is firmly attached.
Step 6: Final Finishing and Blocking

- Fasten off your yarn, leaving a 6-inch tail for weaving.
- Use your tapestry needle to weave all yarn tails securely into the back of the clusters so they are invisible.
- Lightly steam block the bandana to open up the granny stitches and make the picot edging lay perfectly flat.
- Check all connection points on the ties to ensure they can withstand the tension of being tied around the head.
- Your handcrafted vintage bandana is now ready to wear or gift!
Frequently Asked Questions
Q: What is the best yarn for this project?
A: Cotton or a cotton-acrylic blend is best because it provides excellent stitch definition and won’t stretch out too much or become too hot when worn on the head.
Q: How can I make the bandana larger for an adult?
A: Simply continue the row repeats in Step 3 until the top edge is long enough to wrap around the head from ear to ear before adding the ties.
Q: My edges are curling, what should I do?
A: Minor curling is normal during the process. Wet blocking or steam blocking the finished piece will relax the fibers and allow the bandana to lay perfectly flat.
Conclusion
Congratulations on completing your Granny Stitch Bandana! Whether you chose a bold burgundy or a subtle cream, you’ve created a piece that is as functional as it is beautiful. This project is a wonderful way to use up scrap yarn and makes a thoughtful, handmade gift. Keep practicing your tension, and soon you’ll be able to whip these up in every color of the rainbow. Happy hooking!