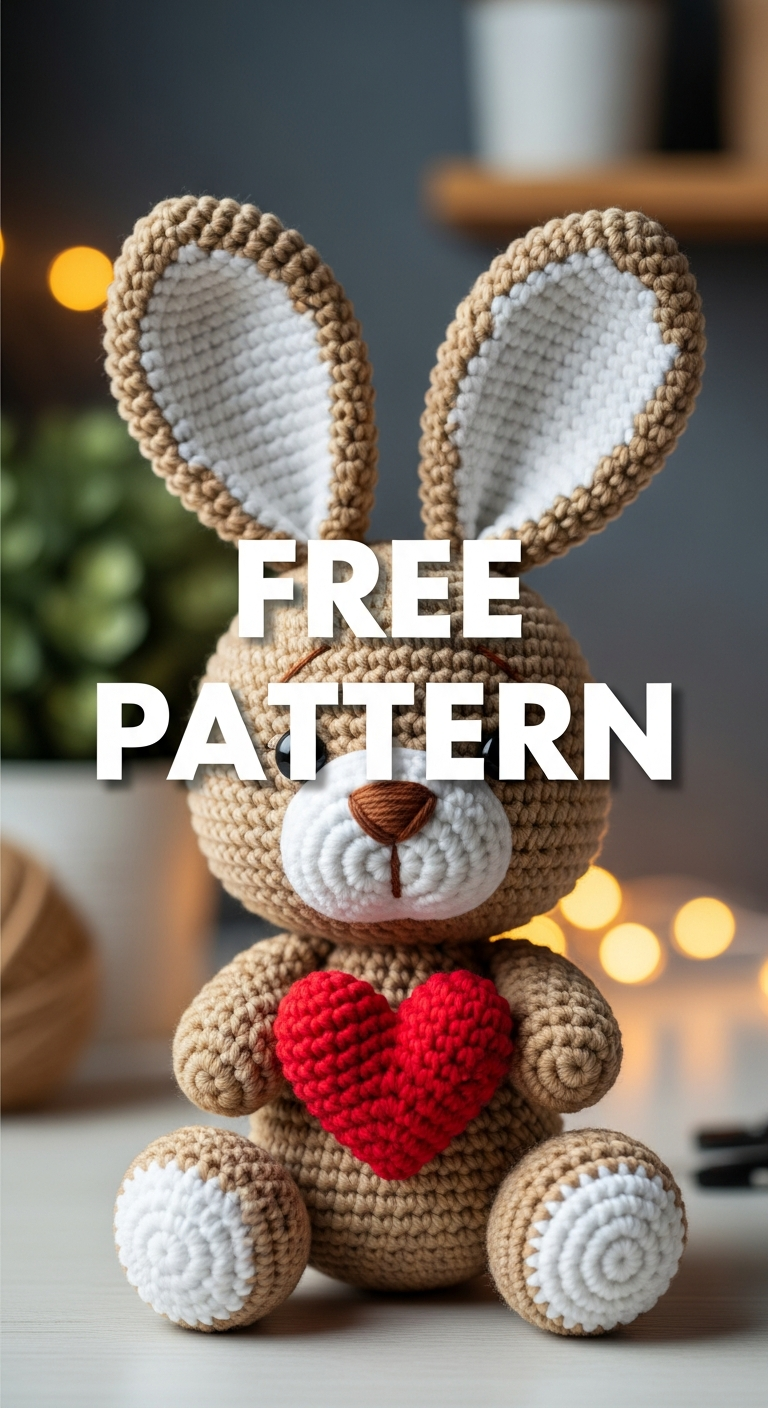
Cuddly Crochet Bunny Amigurumi Pattern with Heart is the perfect pattern for creating a sweet, huggable gift for any occasion, especially Valentine’s Day or Easter. This design features a minimalist aesthetic combined with the incredible softness of chenille yarn, making the final product irresistible. Unlike traditional amigurumi, we utilize bulky velvet yarn and a large hook, resulting in a plushie that works up quickly and has a wonderfully oversized, squishy texture. This pattern guides you through creating the main bunny body, the characteristic long, floppy ears, the tiny arms and legs, and the signature plump red heart that the bunny holds lovingly. While the techniques are straightforward, intermediate crocheters will enjoy the assembly and shaping required to bring this little friend to life. Grab your softest yarn and let’s create a cherished keepsake that’s ready to be boxed up and gifted!
Project Details
- Difficulty: Intermediate
- Time Estimate: 4-6 hours
Materials Needed
- Bulky Weight (Category 5) Chenille/Velvet Yarn in Cream/White (Color A)
- Bulky Weight (Category 5) Chenille/Velvet Yarn in Bright Red (Color B)
- 6.0 mm Crochet Hook
- 9mm Black Safety Eyes
- Polyester Fiberfill Stuffing
- Tapestry Needle for assembly and weaving ends
- Black embroidery floss or fine yarn for nose detail
- Optional: Thin red ribbon or chenille pipe cleaners for ear bows
Abbreviations
- MR: Magic Ring (or Adjustable Ring)
- st(s): stitch(es)
- sc: single crochet
- inc: increase (2 sc in one stitch)
- dec: decrease (sc 2 stitches together)
- sl st: slip stitch
- FO: Fasten Off
- rnd: Round
- ch: chain
Instructions
Step 1: Crocheting the Head and Body (Single Piece)
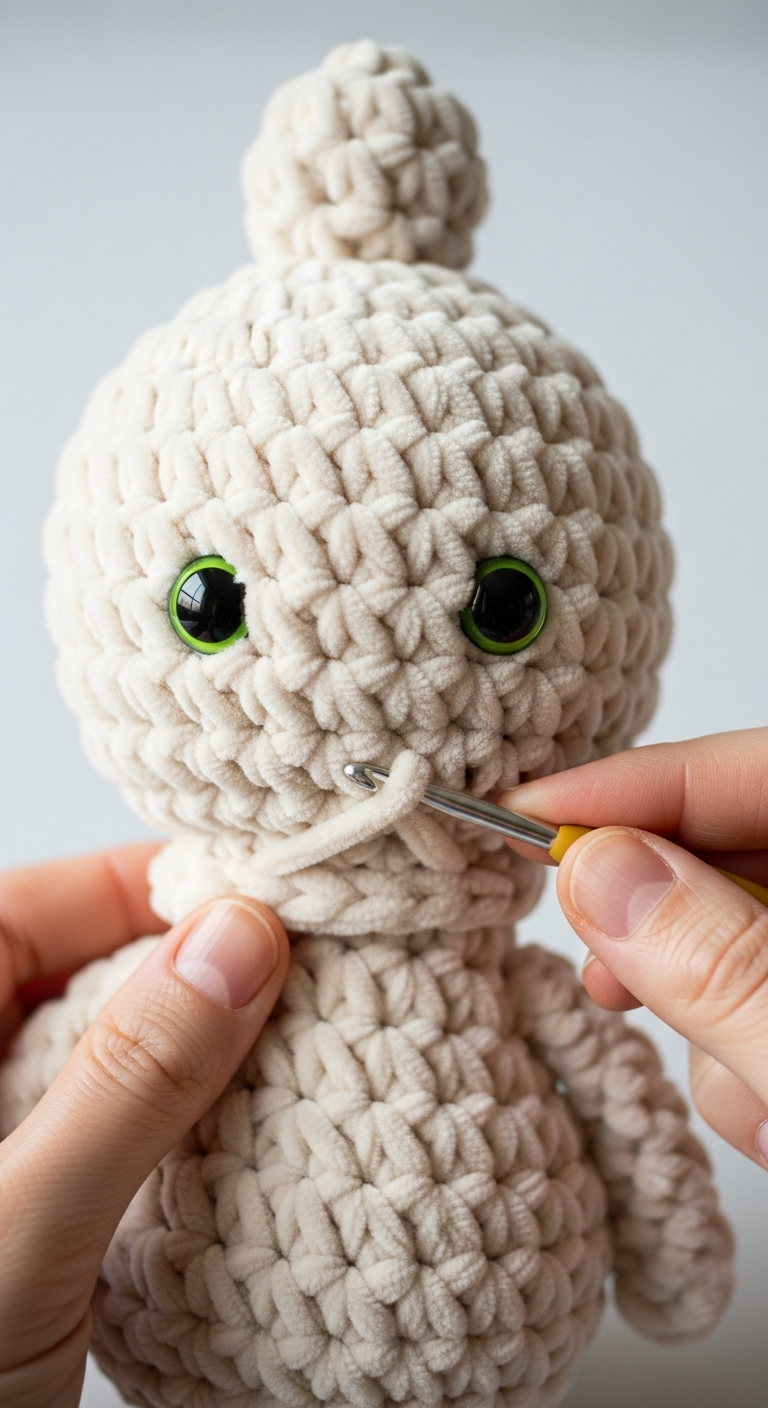
Using Color A (Cream/White) and working in continuous rounds (use a stitch marker): 1. MR 6 sc (6 sts) 2. Inc in each st (12 sts) 3. [Sc 1, inc] x 6 (18 sts) 4. [Sc 2, inc] x 6 (24 sts) 5. [Sc 3, inc] x 6 (30 sts) 6. [Sc 4, inc] x 6 (36 sts) 7-12. Sc around (6 rounds of 36 sts) – *Place safety eyes between Rnd 10 and 11, 6 stitches apart.* 13. [Sc 4, dec] x 6 (30 sts) 14. [Sc 3, dec] x 6 (24 sts) 15. Sc around (24 sts) 16. [Sc 2, dec] x 6 (18 sts) – *Begin stuffing firmly.* 17-25. Sc around (9 rounds of 18 sts) (Body section) 26. [Sc 2, inc] x 6 (24 sts) 27. [Sc 3, inc] x 6 (30 sts) 28-30. Sc around (3 rounds of 30 sts) 31. [Sc 3, dec] x 6 (24 sts) – *Continue stuffing.* 32. [Sc 2, dec] x 6 (18 sts) 33. [Sc 1, dec] x 6 (12 sts) 34. Dec x 6 (6 sts). FO, weave tail through remaining loops and pull tight to close. Hide tail inside the body.
Step 2: Creating the Floppy Ears (Make 2)
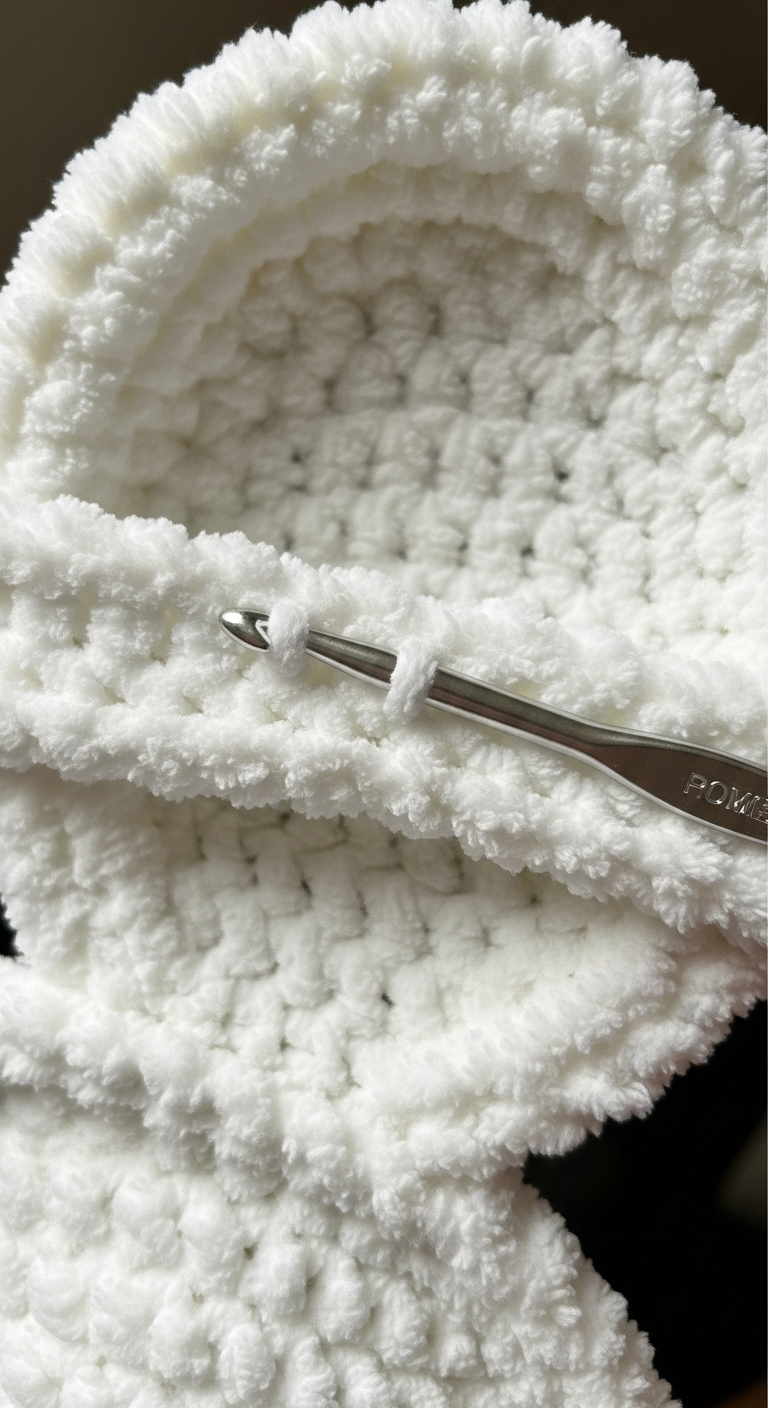
Using Color A (Cream/White): 1. Ch 12. 2. Starting in the second ch from the hook, sc 10, sc 3 in the last ch. Rotate to work along the opposite side of the chain. 3. Sc 9, inc in the last st (24 sts). 4-18. Sc around (15 rounds of 24 sts). 19. [Sc 10, dec] x 2 (22 sts). 20. Sc around (22 sts). 21. [Sc 9, dec] x 2 (20 sts). 22. Sc around (20 sts). 23. Fold the ear flat, sc through both layers across the top opening (10 sc). Leave a long tail for sewing. Do not stuff the ears; they should remain floppy.
Step 3: Crocheting the Heart Centerpiece
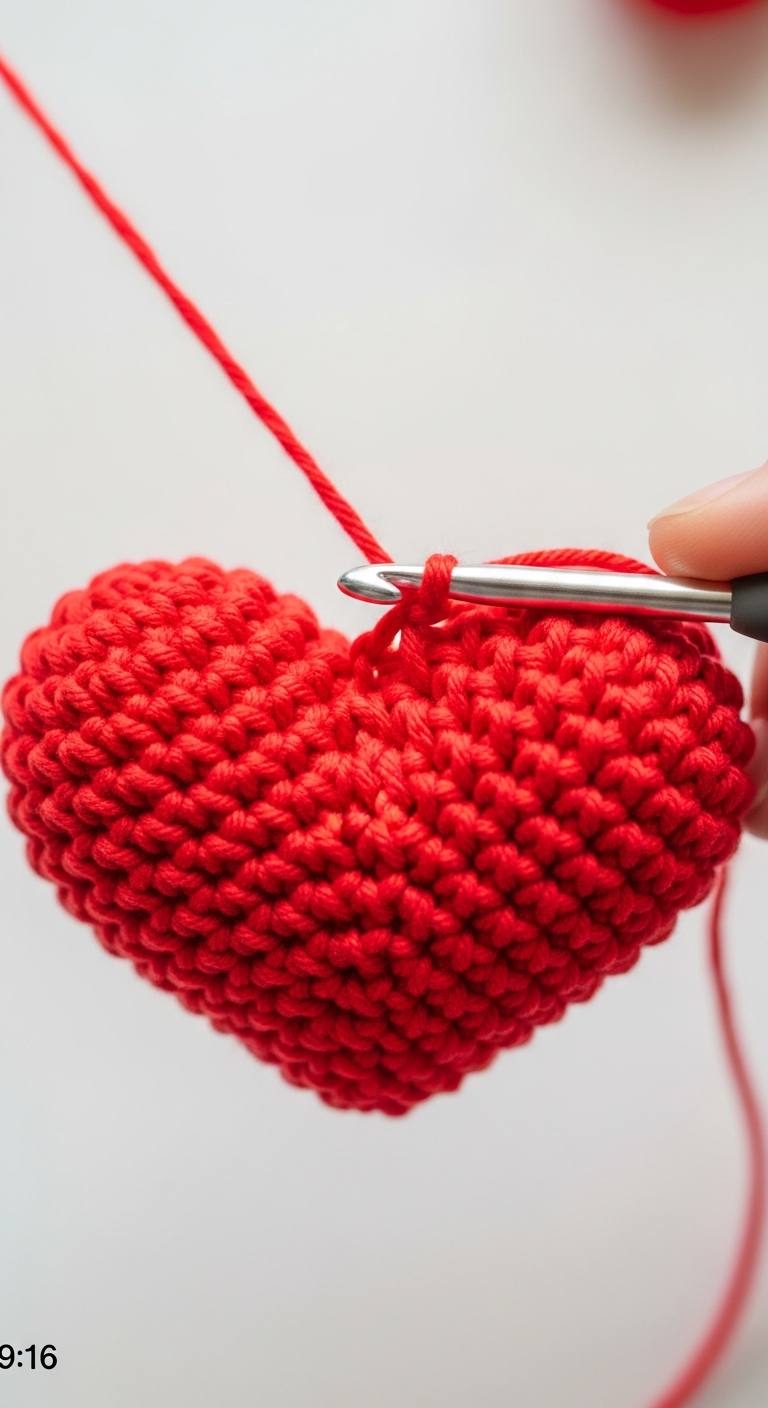
Using Color B (Red Chenille Yarn): *First Half (Make 2):* 1. MR 6 sc (6 sts) 2. Inc in each st (12 sts) 3-4. Sc around (2 rounds of 12 sts). FO one piece, but DO NOT cut yarn on the second piece. *Joining and Shaping:* 5. Ch 1, sc 12 around the first half. Sc 12 around the second half (25 sts total). 6-8. Sc around (3 rounds of 25 sts). 9. [Sc 3, dec] x 5 (20 sts). 10. [Sc 2, dec] x 5 (15 sts). *Stuff the heart firmly.* 11. [Sc 1, dec] x 5 (10 sts). 12. Dec x 5 (5 sts). FO, weave tail to close and secure. Shape the heart.
Step 4: Arms and Legs (Make 2 of each)
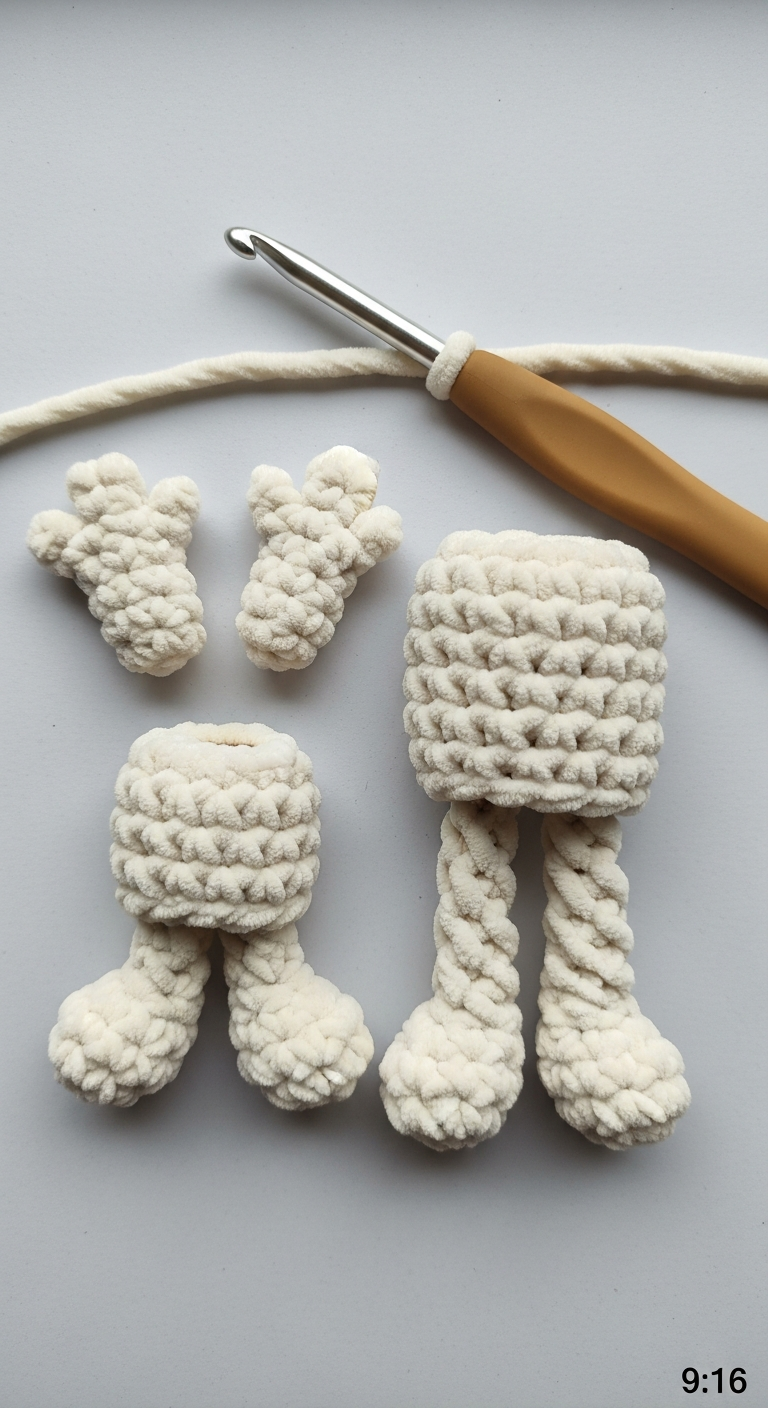
*Arms (Make 2, Color A):* 1. MR 6 sc (6 sts) 2. Inc in each st (12 sts) 3-6. Sc around (4 rounds of 12 sts). 7. [Sc 4, dec] x 2 (10 sts). Sl st and FO, leaving a long tail for sewing. Stuff lightly. *Legs (Make 2, Color A):* 1. MR 6 sc (6 sts) 2. Inc in each st (12 sts) 3. [Sc 3, inc] x 3 (15 sts). 4-6. Sc around (3 rounds of 15 sts). Sl st and FO, leaving a long tail for sewing. Stuff firmly.
Step 5: Assembly and Finishing Details
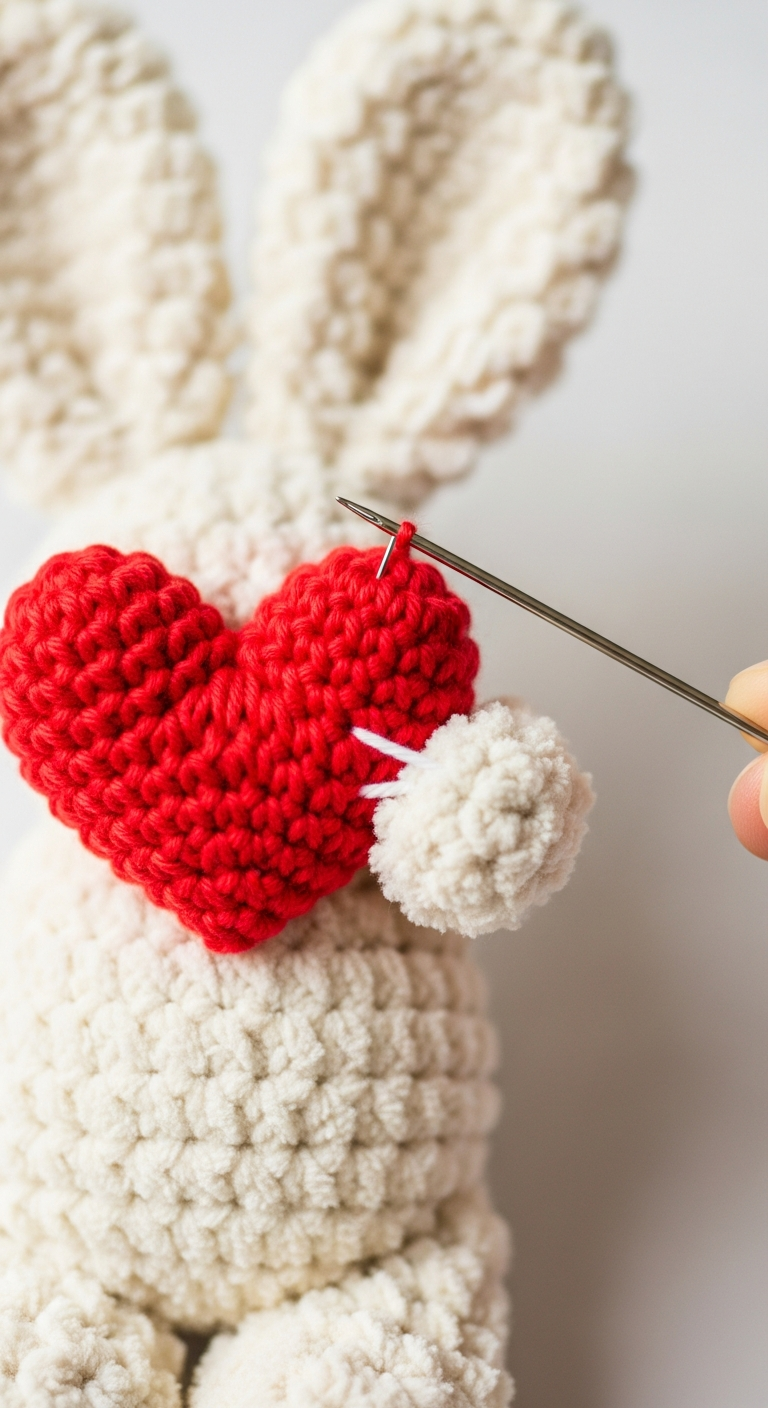
1. **Ears:** Sew the flattened ears securely to the top/sides of the bunny head, positioned slightly toward the back. 2. **Facial Features:** Using black embroidery floss, stitch a small vertical line (a simple T-shape) just below the eyes for the nose and mouth. 3. **Legs:** Sew the legs to the underside of the main body, ensuring the bunny sits flat. 4. **Arms and Heart:** Position the red heart against the center of the bunny’s chest. Sew the arms just above the widest part of the body, curving them forward slightly so they hug the sides of the heart. Stitch the heart gently to the chest and the inside edge of the arms to secure the positioning. 5. **Bows:** Tie small red ribbon bows (or use short pieces of twisted red pipe cleaner) and attach them to the base of the ears for the finishing touch.
Frequently Asked Questions
Can I use worsted weight yarn instead of bulky velvet yarn?
Yes, you can! However, your finished bunny will be significantly smaller and less squishy. If substituting, use a smaller hook (3.0-4.0mm) to maintain a tight gauge so the stuffing doesn’t show through. You may also need to increase the stitch counts slightly on the body to achieve a similar overall shape.
What is the best way to securely attach the arms so they hold the heart?
First, pin the heart in place on the chest. Then, sew the arms to the side of the body just so they wrap around the heart. For the most secure hold, use hidden stitches to tack the heart itself to the chest and then tack the inside edge of the arms directly to the heart, locking it into position.
What are the recommended care instructions for a chenille amigurumi?
Due to the delicate nature of chenille yarn, it is best to spot clean by hand using a damp cloth and mild soap. If machine washing is necessary, place the plushie inside a mesh laundry bag, wash on a cold, delicate cycle, and lay flat or hang to air dry completely. Avoid using a dryer, as it can damage the stuffing and texture.
Congratulations on finishing your Fluffy Heart Bunny! This project is a testament to the warmth and love that can be put into a handmade gift. Whether this little bunny is destined for a baby shower, a birthday, or a special Valentine, its softness and charm are sure to bring joy. We encourage you to personalize your bunny with different bow colors or facial expressions. Don’t forget to share your finished project on social media! Tag us and use the hashtag #HeartBunnyAmigurumi so we can celebrate your beautiful work. Happy crocheting!

![Welcome to the pattern guide for creating these irresistible Sweetheart Gift Amigurumi Crochet Keychain Pattern! These charming, stuffed hearts make the perfect portable tokens of affection. Whether you’re crafting a last-minute Valentine’s Day gift, adding a personalized touch to your own keys or backpack, or looking for a fast-selling craft fair item, this amigurumi project delivers maximum impact for minimal effort. The tight, smooth single crochet texture gives them a professional, durable finish, while the clever use of contrasting yarn for the bow detail elevates the design from simple heart to a tiny, wrapped present. While the construction uses basic stitches, we categorize this as Intermediate due to the shaping involved, specifically when joining the two top lobes and executing the invisible decreases required to achieve the sharp point of the heart. We’ll be working in continuous rounds to minimize seams. Grab your favorite contrasting pinks and reds, a small hook, and let's start creating these perfectly plump, gift-wrapped hearts that everyone will adore! Project Details Difficulty: Intermediate Time Estimate: 1.5 hours per heart Materials Needed DK Weight (Weight 3) or Worsted Weight (Weight 4) yarn in two contrasting colors (e.g., Red and Light Pink) Size C/2 (2.75mm) or D/3 (3.25mm) crochet hook (adjust based on yarn weight to achieve tight tension) Polyester fiberfill stuffing Tapestry needle for weaving ends and assembly Scissors Keyring or lobster clasp hardware Abbreviations MR: Magic Ring ch: Chain sc: Single Crochet inc: Increase (2 sc in one stitch) dec: Invisible Decrease (sc 2 together) sl st: Slip Stitch st(s): Stitch(es) R: Round Instructions Step 1: Crocheting the Heart Lobes (Make 2) Using the Main Color (e.g., Red or Light Pink), we will create two identical small dome shapes, which form the top curves of the heart. Work in continuous rounds (do not join at the end of rounds). R1: 6 sc in a MR (6) R2: [inc] x 6 (12) R3: [sc, inc] x 6 (18) Fasten off the first lobe. Do NOT fasten off the second lobe; you will continue crocheting the body from here. Step 2: Joining the Lobes and Establishing the Heart Body Now we join the two completed lobes. From the second lobe (where you did not fasten off): R4: sc 18 around the second lobe, then sc 18 around the first lobe. (36) Place a stitch marker to indicate the new start of the round. This establishes the continuous round around the entire circumference of the combined shape. R5-R7: sc around (36). (3 rounds of no increase/decrease) Step 3: Shaping the Point and Stuffing We will now begin the decreases to shape the bottom V of the heart. Use the invisible decrease (dec) technique for a clean look. R8: [sc 4, dec] x 6 (30) R9: sc around (30) R10: [sc 3, dec] x 6 (24) R11: sc around (24) Start stuffing the heart firmly with fiberfill, shaping the top curves. Continue stuffing as you decrease. R12: [sc 2, dec] x 6 (18) R13: [sc, dec] x 6 (12) R14: [dec] x 6 (6) Cut yarn, leaving a long tail for closing. Thread the tail onto a tapestry needle and weave it through the front loop of the remaining 6 stitches. Pull tight to close. Knot and weave in the end. Step 4: Crocheting the Contrast Bow Using the Contrast Color (e.g., the Red yarn for the Pink heart, or Light Pink for the Red heart). Bow Centerpiece (Rectangle): Chain 7. Starting in the 2nd chain from the hook, sc 6. (6) Row 2-3: Ch 1 (does not count as st), turn, sc 6. (6) Fasten off, leaving a long tail (approx. 10 inches). Assembly: Using the tail, pinch the center of the rectangle tightly together to form the bow shape. Wrap the yarn tightly around the pinched center a few times and knot securely at the back. Trim the first starting tail, but keep the wrapping tail long for Step 5. Step 5: Wrapping, Attachment, and Finishing Wrap the contrast yarn around the heart: Take a long strand (about 20 inches) of the Contrast Color yarn. Wrap it around the body of the heart, vertically and horizontally, to mimic a gift ribbon (as shown in the image). Secure the ends at the back of the heart with a knot, leaving them long. Attachment: Using the long tail from the bow (Step 4), position the bow over the center where the vertical and horizontal wraps meet. Sew the bow securely onto the heart, stitching through the center of the bow and into the body of the heart. Knot all remaining tails and weave them inside the stuffing. Keychain Hardware: Attach the keyring or clasp hardware securely to the top center, in the valley between the two lobes. Use a small stitch or strong thread to secure the jump ring if necessary. Frequently Asked Questions My hearts are too floppy. How do I get that firm, rounded shape? The key to firm amigurumi is tension and stuffing. Ensure you are crocheting tightly enough that the stuffing doesn't show through the stitches. Stuff the heart very firmly, particularly around the lobes and the base, using small tufts of fiberfill pushed into the corners before closing. Can I use thicker yarn like blanket yarn for this pattern? Yes, but the size will increase significantly. If using bulkier yarn (like Bernat Blanket or Super Bulky), you will need to adjust your hook size up (e.g., 5.0mm-6.0mm) and ensure you use a tight gauge to prevent the stuffing from escaping. The shaping steps remain the same. What are the best care instructions for a crochet keychain? Spot clean only using a damp cloth and mild soap. Avoid machine washing, especially if using delicate acrylic or cotton yarns, as the stuffing may clump and the hardware may rust or detach. Allow to air dry completely. Congratulations on completing your stunning crocheted Sweetheart Keychain! These little gems are instant mood boosters and make thoughtful, heartfelt gifts for friends, family, or partners. They prove that the best projects don't always take the longest. We encourage you to play around with different color combinations—imagine metallic silver bows on black hearts, or striped patterns for a festive look. Don't forget to snap a photo of your finished heart and share it online! Tag us so we can admire your beautiful handmade tokens of love.](https://softstitchy.com/wp-content/uploads/2026/02/step-5-1770448018-6986e49220ff7-768x768.png)