Crochet Magnolia Wall Hanging Pattern: Framed Floral Art-Welcome to a project that merges the art of crochet with elegant home decor! This Framed Magnolia Wall Hanging captures the timeless beauty of botanical art in fiber form. Perfect for adding a sophisticated, handcrafted touch to any room, this piece utilizes textured stitches to create realistic petals and lush, trailing greenery, giving the illusion of a potted vine spilling gracefully from its frame. This pattern is rated Intermediate, primarily due to the assembly and shaping required for the realistic flower components and the numerous leaves. We will focus on creating a tight gauge using cotton yarn to ensure the leaves and petals hold their shape beautifully without excessive starching. The dark wooden frame provides a beautiful contrast, making the crisp white Magnolia and deep green vine truly pop. Gather your materials and let’s begin crafting this stunning piece of permanent bloom art.
Project Details
- Difficulty: Intermediate
- Time Estimate: 6-8 hours
Materials Needed
- DK Weight (Light Worsted/Weight 3) 100% Cotton Yarn in:
- Color A: Crisp White (for petals)
- Color B: Dusty Pink (for flower center)
- Color C: Deep Forest Green (for leaves and vine)
- 3.0 mm or 3.25 mm crochet hook (adjust to achieve tight tension)
- Small wooden open-style frame (approx. 5×7 inches internal measurement)
- Tapestry needle
- Scissors
- Stitch markers
- Hot glue gun or strong thread for secure attachment to frame
Abbreviations
- ch: chain
- sl st: slip stitch
- sc: single crochet
- hdc: half double crochet
- dc: double crochet
- tr: treble crochet
- bobble: bobble stitch (Yarn over, insert hook, pull up loop, yarn over, pull through 2 loops. Repeat 4 more times in same stitch. Yarn over, pull through all 6 loops on hook.)
- FO: Fasten Off
- st(s): stitch(es)
- magic ring: adjustable ring
Instructions
Step 1: Crochet the Magnolia Flower Center (Color B)
Using Color B (Pink) and the magic ring method: Rnd 1: Ch 2 (does not count as st), work 10 hdc into the magic ring. Sl st to join. (10 sts). Rnd 2: Ch 3 (counts as dc). Work 1 bobble st in the same st. *Sl st into next st, ch 3, bobble st into the same st.* Repeat from * around, ending with a sl st to the starting ch-3 base. FO, leaving a long tail for attachment. The bobble stitches create the central textured seed structure.
Step 2: Create the Inner and Outer Petals (Color A)
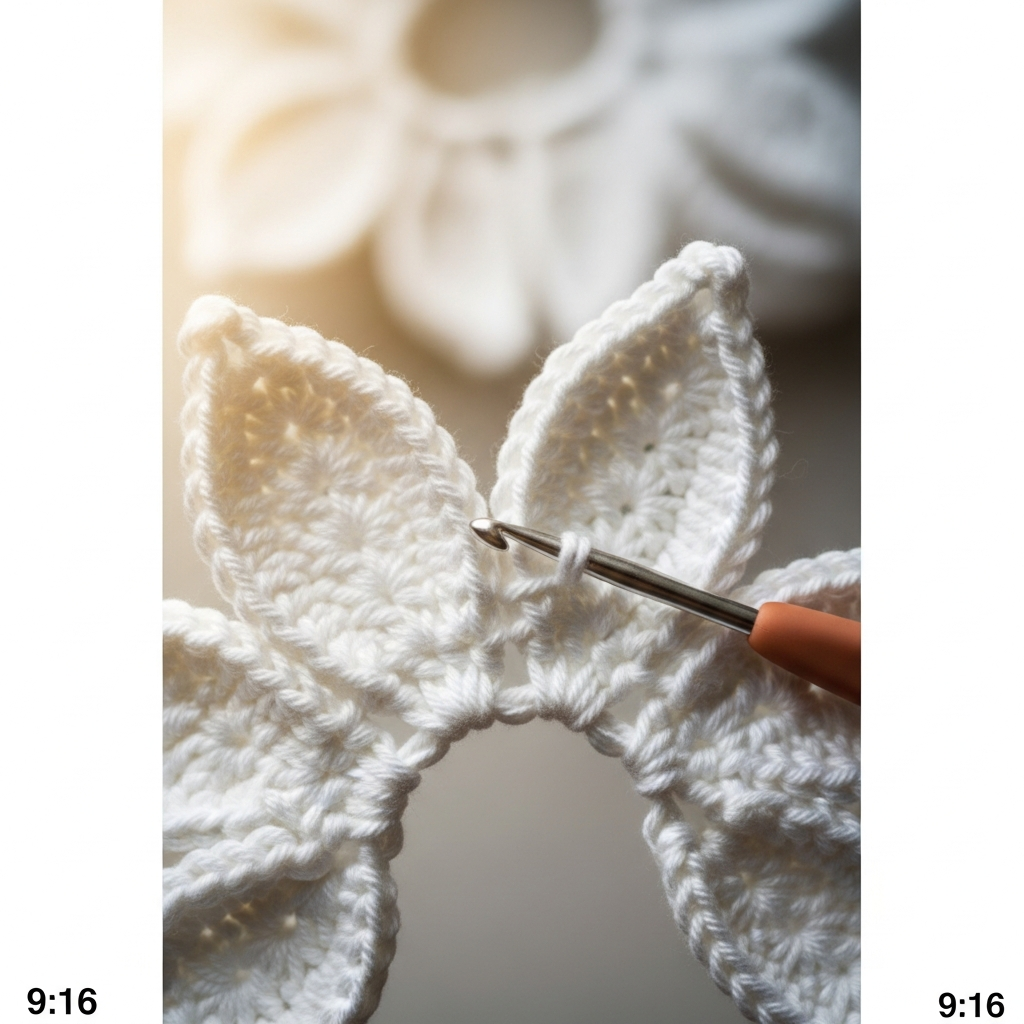
You will make 6 Inner Petals and 8 Outer Petals (14 total). Work in rows for shaping. Chain 10. Row 1: Sc in 2nd ch from hook, hdc in next 2 ch, dc in next 4 ch, hdc in next ch, sc in last ch. Ch 1, turn. (9 sts). Row 2: Sc in first st, hdc in next st, dc in next 5 sts, hdc in next st, sc in last st. Ch 1, turn. Row 3: Sc in each st across. FO for Inner Petals. For Outer Petals: Repeat Rows 1-3. Then, Row 4: Ch 3 (counts as dc), dc in next st, tr in next 5 sts, dc in next st, sc in last st. FO. Use matching yarn to lightly pinch and sew the base of each petal together to give them a curved, cupped shape. Assemble the inner ring of 6 petals around the pink center, followed by the outer ring of 8 petals slightly offset.
Step 3: Crochet the Individual Trailing Leaves (Color C)
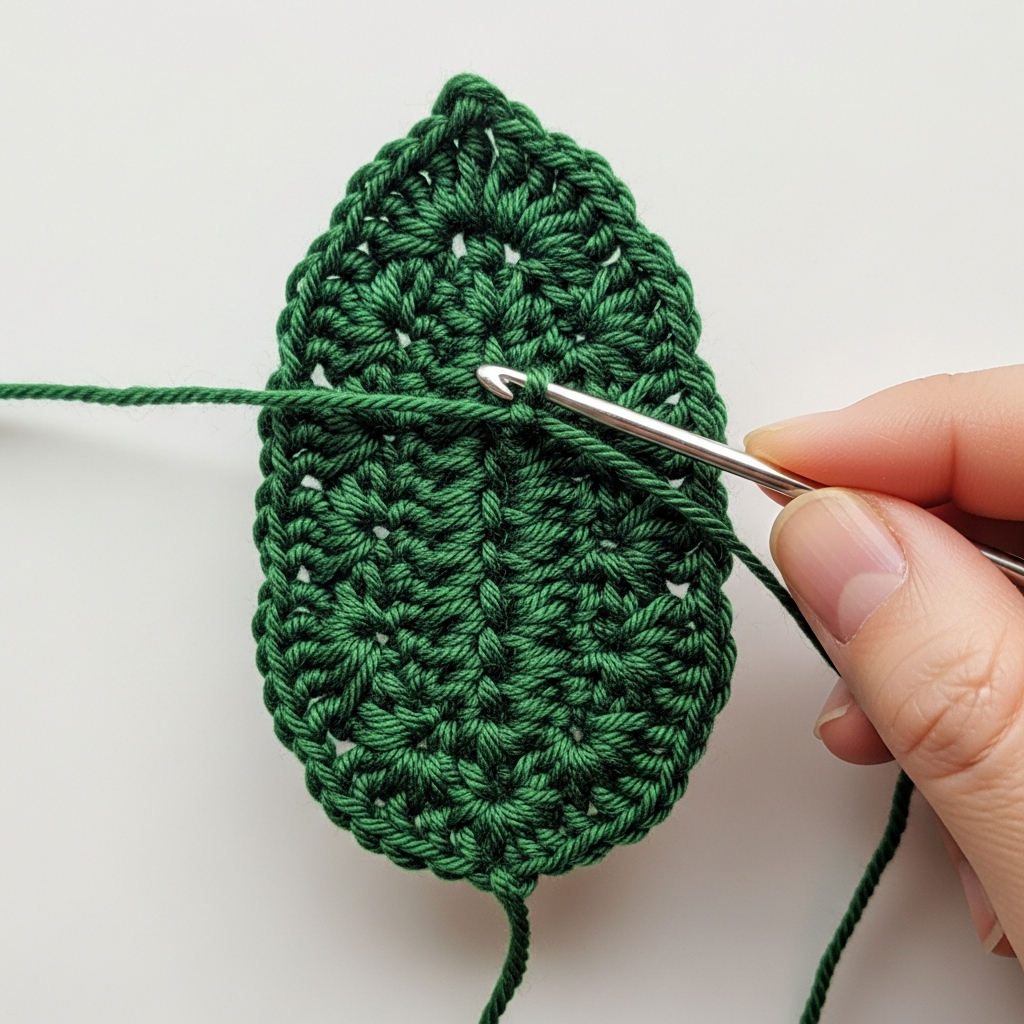
Each leaf is worked in the round around a foundation chain. Make 12-15 leaves of varying sizes (Small: Ch 7, Medium: Ch 9, Large: Ch 11). For a Large Leaf (Ch 11): Rnd 1: Sc in 2nd ch from hook, hdc in next st, dc in next 6 sts, hdc in next st, 3 sc in last ch (corner turn). Continuing on the back side of the chain: hdc in next st, dc in next 6 sts, hdc in next st, sc in last st. Sl st to join at beginning sc. FO. The tight gauge of the cotton yarn is crucial here for stiffness. Steam block lightly if necessary, shaping the leaves with your fingers to be slightly convex.
Step 4: Construct the Trailing Vine and Top Foliage
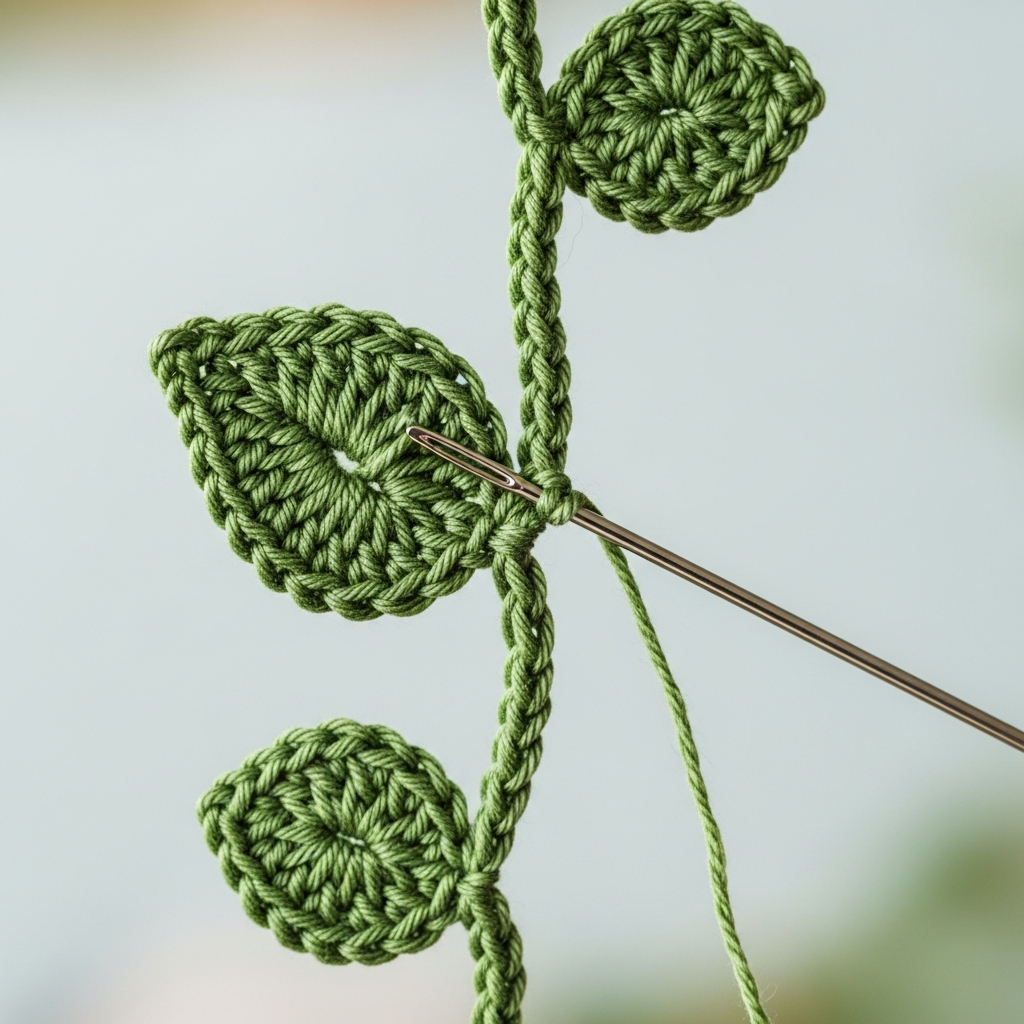
The vine consists of a long chain connecting the leaves. Determine the desired trailing length (approx. 10-12 inches). Using Color C, Ch 30. Sl st in the back loop of the chains to create a sturdy stem. Attach the individual leaves securely to this main stem using whipstitch or the yarn tails left on the leaves. Arrange the leaves alternating sides and decreasing in size towards the bottom of the vine. Additionally, attach 4-5 leaves directly around the base of the assembled Magnolia flower to create a dense foliage cluster.
Step 5: Assembly and Framing
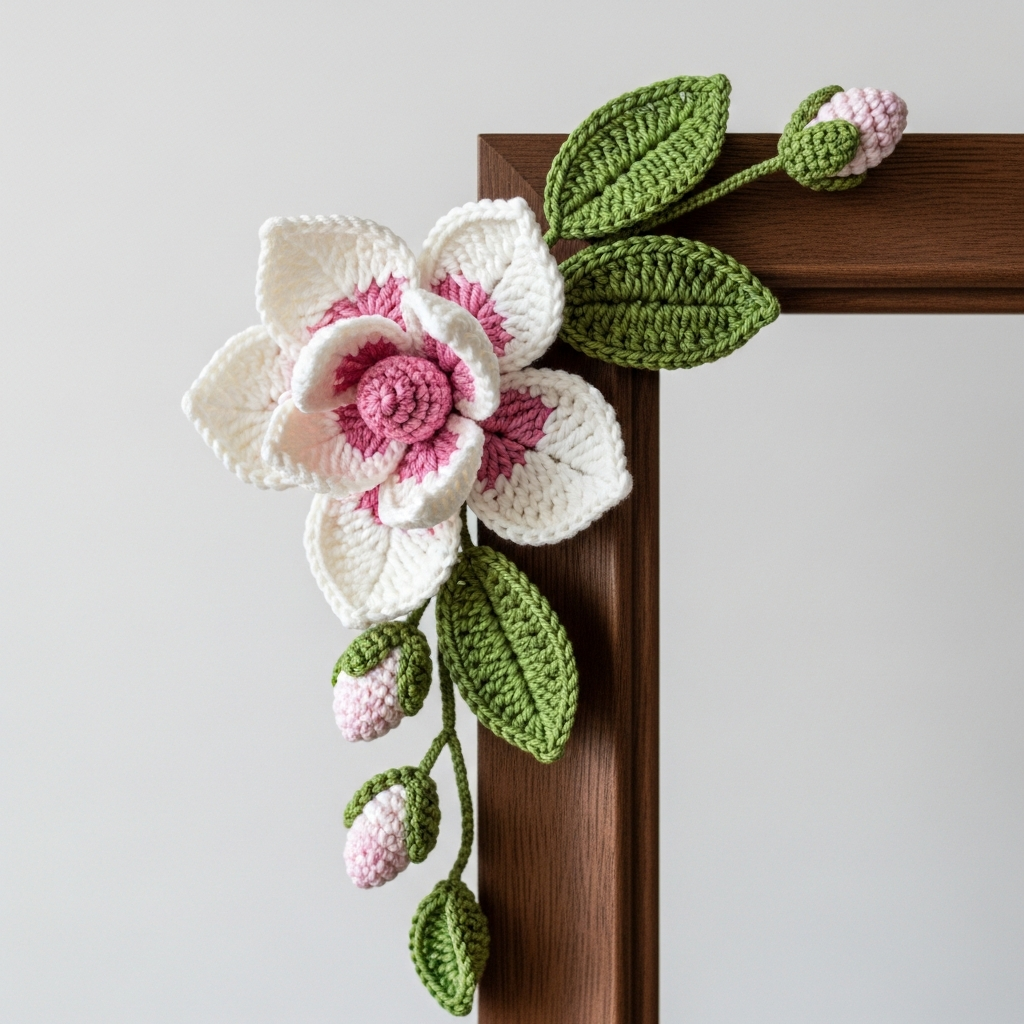
Position the finished Magnolia flower and the top foliage cluster in the upper corner of the wooden frame. Use a hot glue gun or strong thread to firmly secure the flower and the bases of the top leaves to the frame wood. Ensure the connection is stable. Allow the constructed vine to drape naturally down through the open center of the frame. Secure the top portion of the vine stem to the underside of the frame to prevent slipping. Add a piece of twine or jute to the top hardware for hanging.
Frequently Asked Questions
Can I use a different yarn weight, like worsted acrylic?
While you can substitute yarn, we highly recommend DK weight cotton. Worsted acrylic will result in a much larger and floppier flower and leaves, which may not hold the crisp, structured shape needed for this wall art. If using worsted, go down a hook size (e.g., 2.5 mm) to maintain firmness.
How can I make the leaves lay flat and maintain their shape?
The key is tight tension and cotton yarn. If they still curl, you can wet block them by pinning them flat to a foam board and allowing them to dry completely. For extra stiffness, mix a small amount of fabric stiffener or white glue with water and brush it lightly onto the finished leaves before pinning and drying.
What are the care instructions for this framed art piece?
Due to the framing and assembly with glue, this item should not be submerged in water. For dusting, gently use a lint roller or a can of compressed air. If necessary, spot clean the crochet portions very carefully with a damp cloth and mild soap, ensuring the water does not affect the wooden frame or the adhesive.
Congratulations! You have successfully crafted a stunning, permanent botanical display. This crochet Magnolia Wall Hanging brings a touch of spring elegance that lasts all year long. This project is a wonderful way to practice detailed shaping and assembly techniques, resulting in a piece of art you can proudly hang or gift. We love seeing your creations! Be sure to tag us on social media and share your unique framed floral art—happy crocheting!