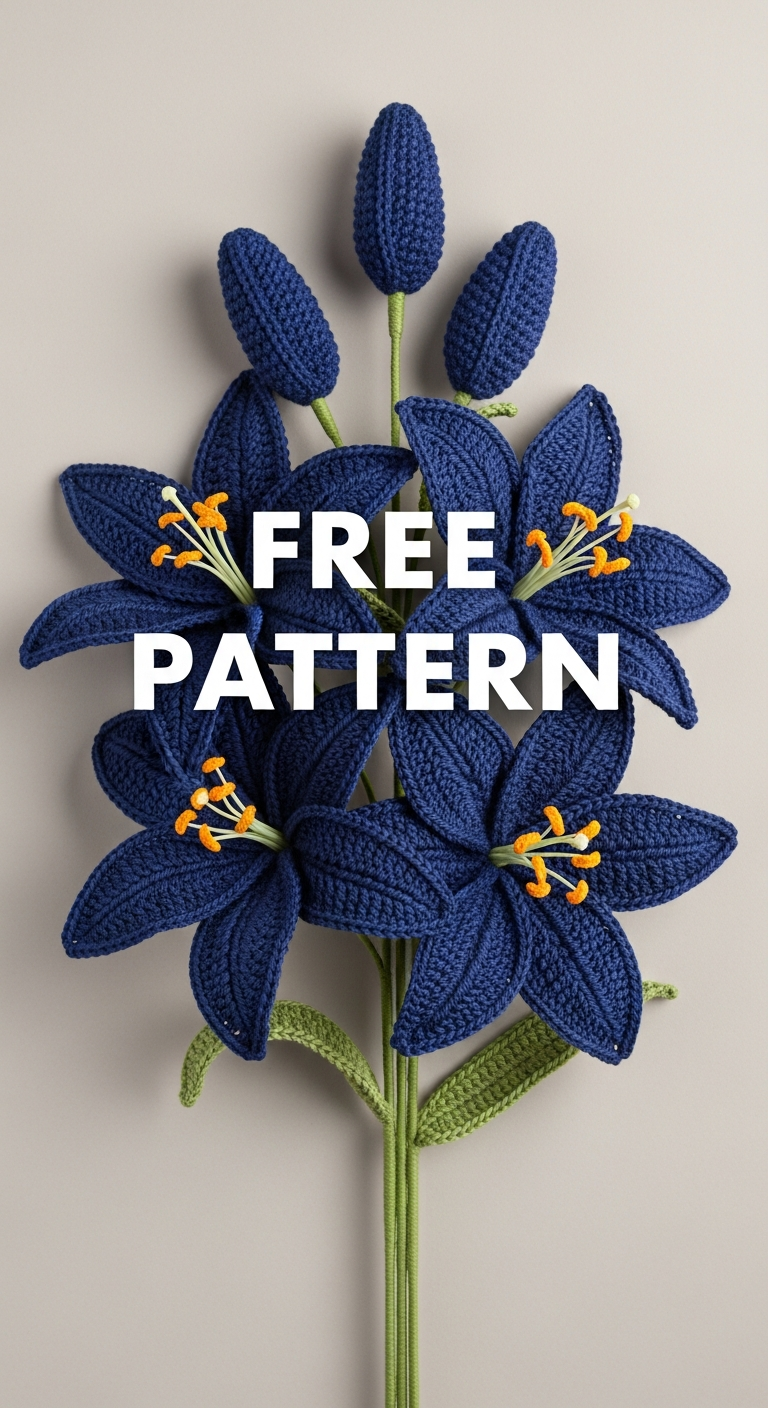
Welcome to the exquisite world of perpetual blooms! This pattern guide will walk you through creating a Majestic Crochet Lily Bouquet Pattern | Navy Blue Flower Gift, rendered in a striking, rich navy blue. Unlike fresh cut flowers, this handcrafted masterpiece will last forever, making it the ultimate heartfelt gift for anniversaries, Mother’s Day, or simply to add an elegant, maintenance-free touch to your home decor. The deep indigo hue of the yarn provides a luxurious, dramatic contrast to the classic floral shape, elevating this project far beyond typical craft flowers. We will be utilizing basic single crochet stitches worked in flat rows and rounds to create the distinctly shaped petals and the central stamen. While this pattern is accessible to a confident beginner, the shaping and precise assembly steps move it into the Intermediate category, ensuring a polished, professional finish. Follow our detailed instructions to craft the six perfectly formed petals, assemble them onto a sturdy stem, and finish the look with professional florist wrapping. Prepare your yarn and hook—it’s time to create something truly everlasting!
Project Details
- Difficulty: Intermediate
- Time Estimate: 3-4 hours
Materials Needed
- Approx. 50g DK or Worsted Weight Yarn (Color A: Deep Navy Blue)
- Small amount of Sport Weight or Embroidery Thread (Color B: Gold/Yellow) for stamen
- 3.0mm or 3.5mm Crochet Hook (to match yarn weight for tight fabric)
- 3 pieces of 18-gauge floral wire (for petals, optional)
- 1 piece of thick floral wire (16-gauge or covered stem wire)
- Fiberfill stuffing
- Tapestry needle
- Wire cutters and pliers
- White or Clear Wrapping Paper/Florist Paper
- Royal Blue Satin Ribbon
Abbreviations
- CH: Chain
- SC: Single Crochet
- SL ST: Slip Stitch
- INC: Increase (2 SC in one stitch)
- DEC: Invisible Decrease (SC 2 stitches together)
- FO: Fasten Off
- ST: Stitch
Instructions
Step 1: Crocheting the Lily Petals (Make 6)
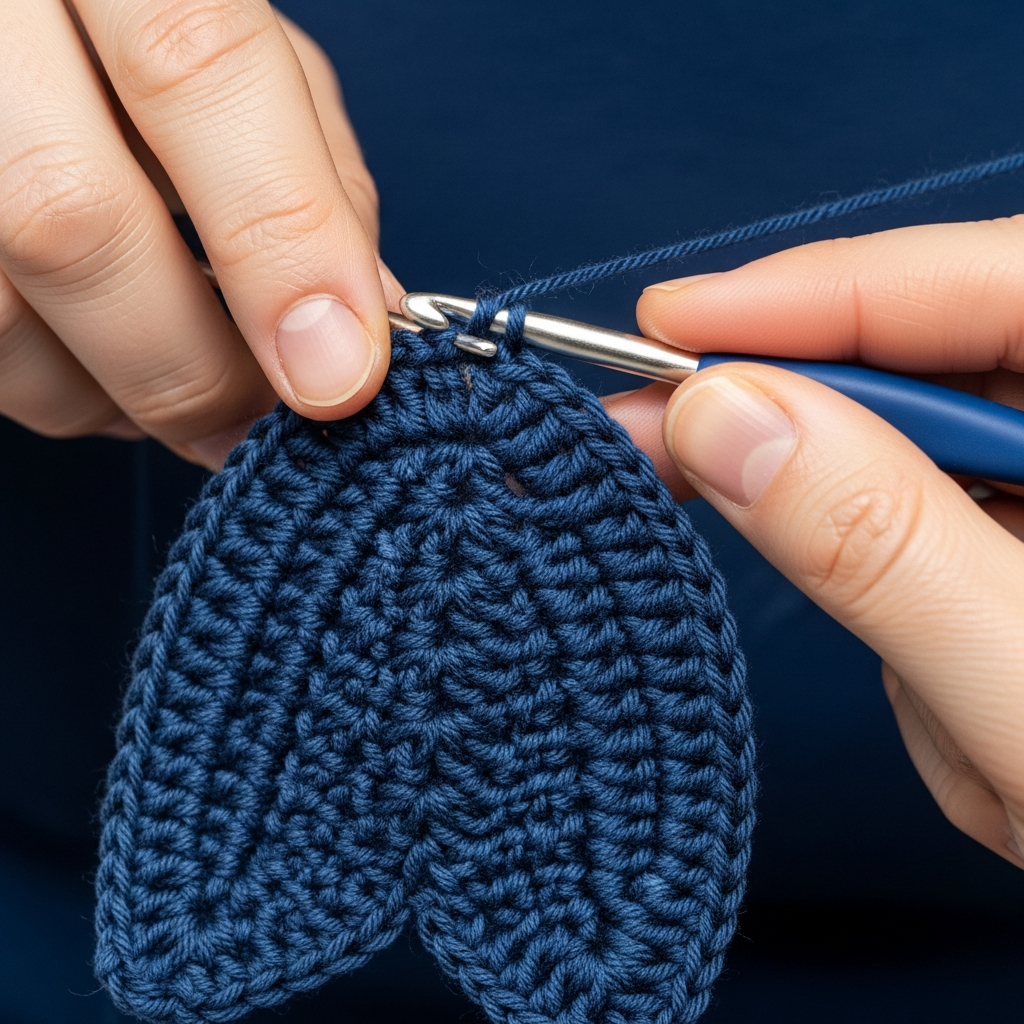
Using Color A (Navy Blue), we will work the petals in turning rows. CH 7. Row 1: SC in the 2nd CH from hook and in each remaining CH across. (6 SC) Row 2 (Increase Row): CH 1, turn. INC in first ST, SC in the next 4 ST, INC in the last ST. (8 SC) Row 3 – Row 10: CH 1, turn. SC in each ST across. (8 SC for 8 rows) Row 11 (Decrease Row): CH 1, turn. DEC, SC in the next 4 ST, DEC. (6 SC) Row 12: CH 1, turn. DEC, SC in the next 2 ST, DEC. (4 SC) Row 13: CH 1, turn. DEC twice. (2 SC) Row 14: CH 1, turn. DEC. (1 SC). FO, leaving a long tail for sewing. Repeat this sequence to create 6 identical petals.
Step 2: Creating the Stamen and Central Base
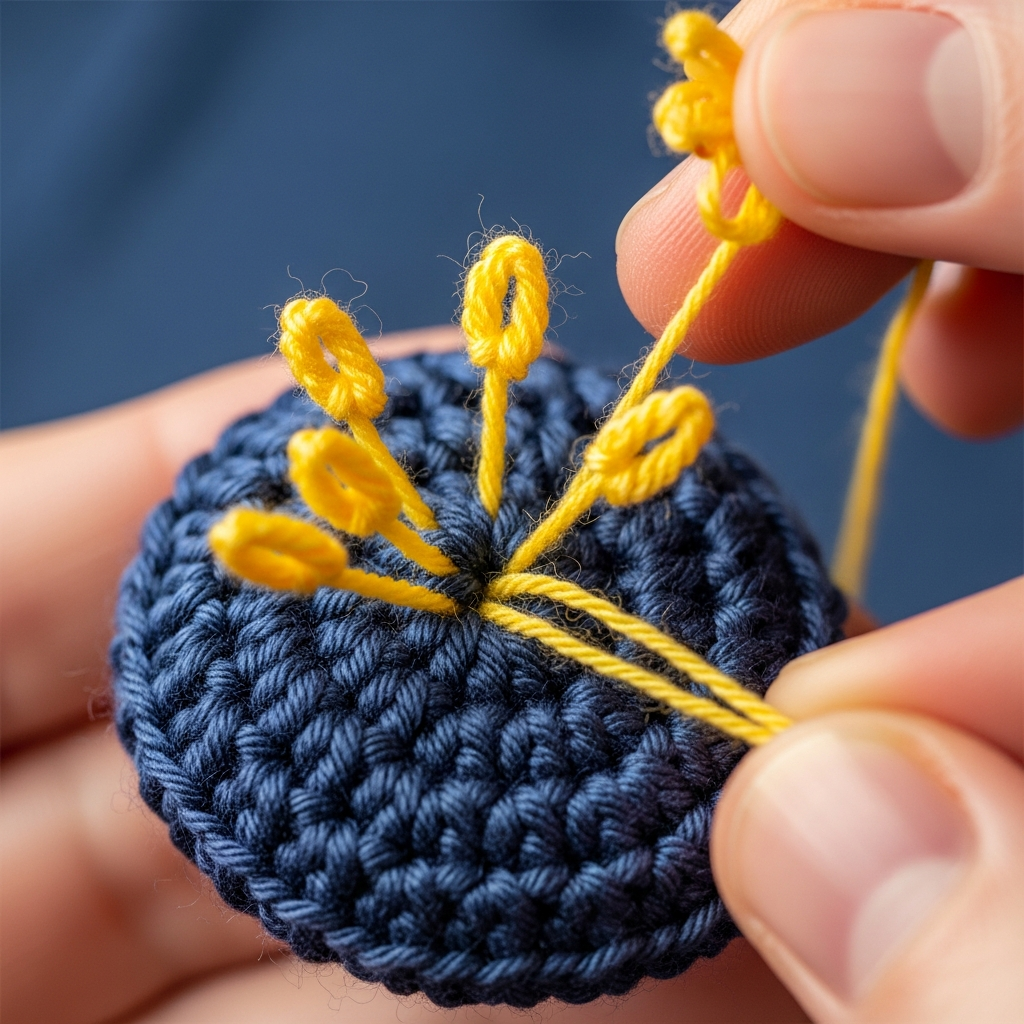
A. Stamen: Cut 3-5 strands of Color B (Yellow/Gold) thread, each about 3 inches long. Dip the ends into craft glue to stiffen them and allow them to dry, or use pre-made plastic stamen pieces if available. B. Center Base: Using Color A, make a small flat circle. Magic Ring (MR), SC 6 into MR. R2: INC in each ST (12 SC). SL ST and FO, leaving a long tail. This disk will hide the joins and hold the stamen.
Step 3: Assembling the Flower Head

Place the thick stem wire (16-gauge) into the center. Take one petal and wrap its starting tail around the top of the wire to secure. Arrange the 6 petals evenly around the central wire. There are 3 outer petals and 3 inner petals, slightly offset. Use the long tails from the petals to sew them securely together at the narrow base, ensuring the flower holds its open shape. Once secure, thread the central base (Step 2B) onto the stem wire and sew it over the base of the petals to cover the joins. Insert the stamen bundle into the center disk, securing it with glue or sewing.
Step 4: Finishing the Stem and Bud Wrapping
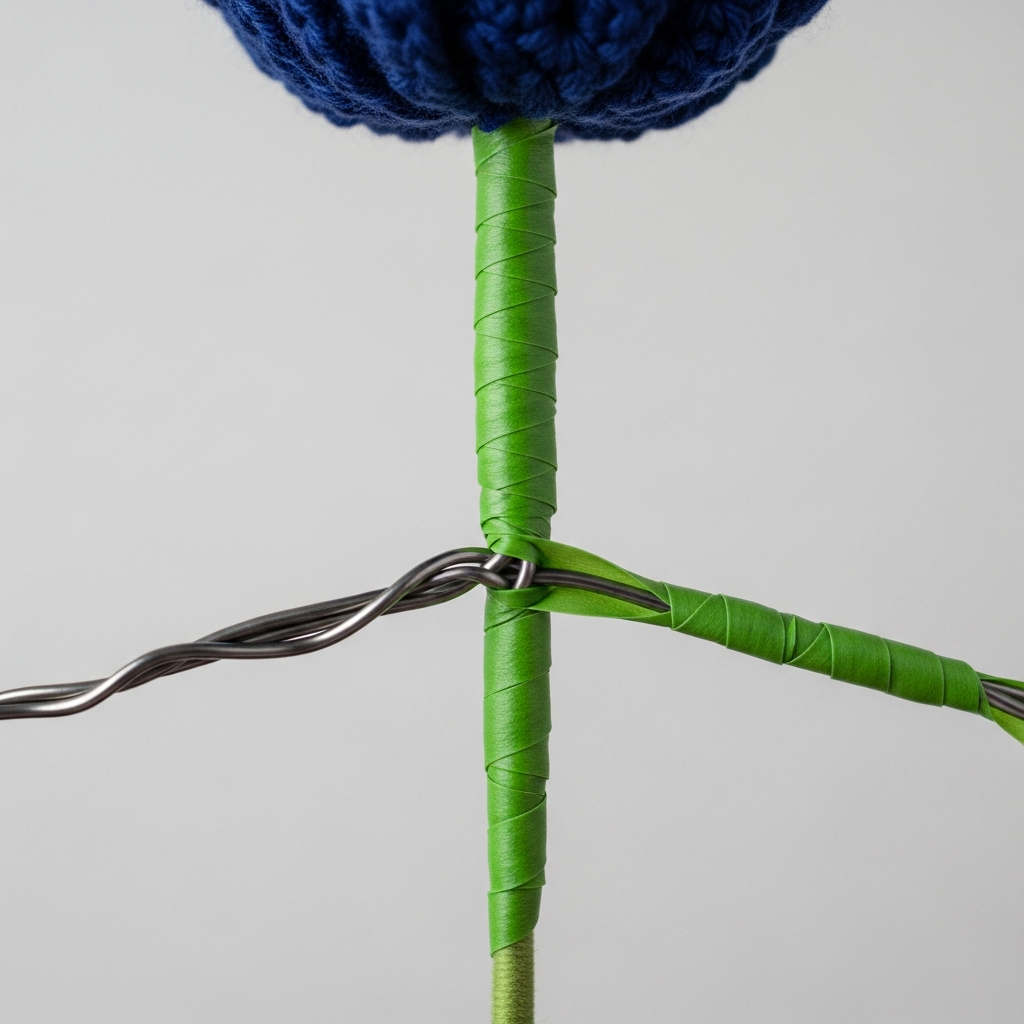
Wrap the thick stem wire tightly with green floral tape from the base of the flower down to the end of the wire. If desired, you can crochet a small green leaf (CH 10, then SC, HDC, DC, TR, DC, HDC, SC, SL ST) and attach it midway down the stem. Ensure the stem is straight and secure. The overall flower height should be suitable for a small bouquet (approx. 12-14 inches).
Step 5: Professional Bouquet Wrapping
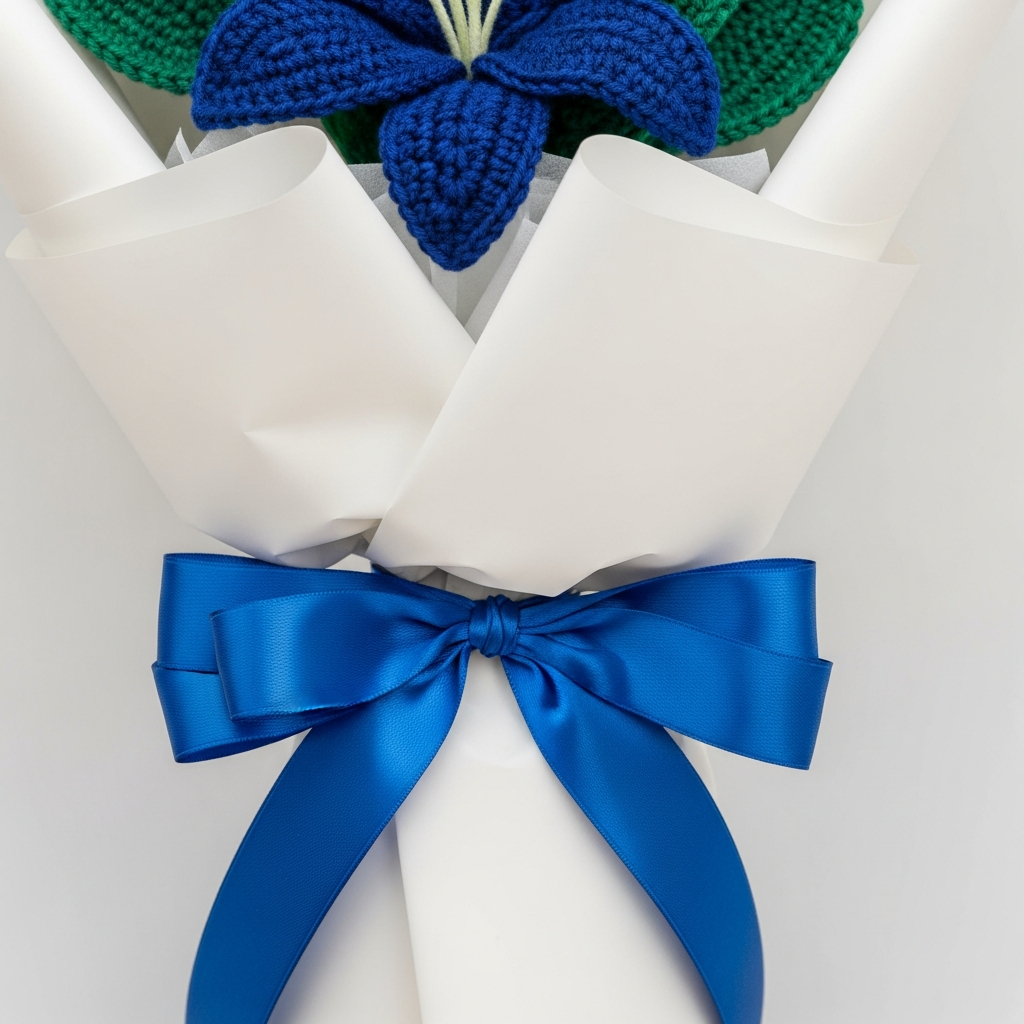
This step replicates the elegant florist style seen in the image. Take a piece of stiff white florist paper (or cardstock/parchment paper). Fold it loosely around the base of the flower head to create a structured collar. Use a second piece of white paper, folded into an inverted cone shape, to form the lower wrap around the stem. Secure the paper tightly around the stem using clear tape or a thin string. Finish the bouquet by tying a generous bow using the royal blue satin ribbon where the paper wrap meets the stem holder, matching the striking color of the Lily.
Frequently Asked Questions
Can I use a different yarn weight for this pattern?
Yes, you can substitute worsted weight for DK or vice versa, but be aware that it will change the size of the petals. If you change the yarn weight, you must adjust your hook size to maintain a tight gauge. A tight gauge is crucial for structured amigurumi flowers to prevent stuffing or wire from showing.
How do I make a larger bouquet with more lilies?
To create a fuller bouquet, plan to crochet 3 to 5 lilies, plus a few small green leaves or baby’s breath pieces (crocheted or artificial). Ensure your stem wires are varying lengths for a staggered, natural appearance before wrapping them all together tightly with floral tape.
What are the best care instructions for a crochet flower bouquet?
Crochet flowers are very durable. If dusting is required, use a lint roller, a soft brush, or a gentle puff of compressed air. If it needs cleaning, spot clean with mild soap and cold water. Never put wired flowers in a washing machine or dryer. Avoid prolonged direct sunlight to prevent color fading.
Congratulations on finishing your stunning Majestic Navy Crochet Lily! This project transforms simple yarn into a luxurious, statement piece that captures attention and offers a permanent token of affection. Whether displayed on your mantelpiece or gifted to a loved one, the lasting beauty of this flower is a testament to your crochet skill. Don’t forget to photograph your finished bouquet, complete with its elegant wrapping, and share your masterpiece with the crochet community. We can’t wait to see your work!